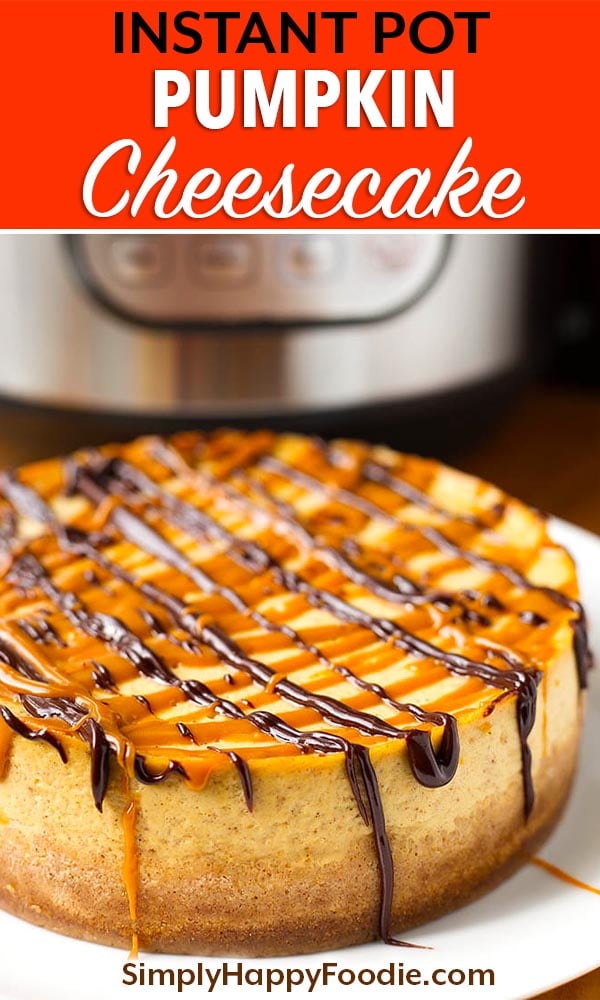
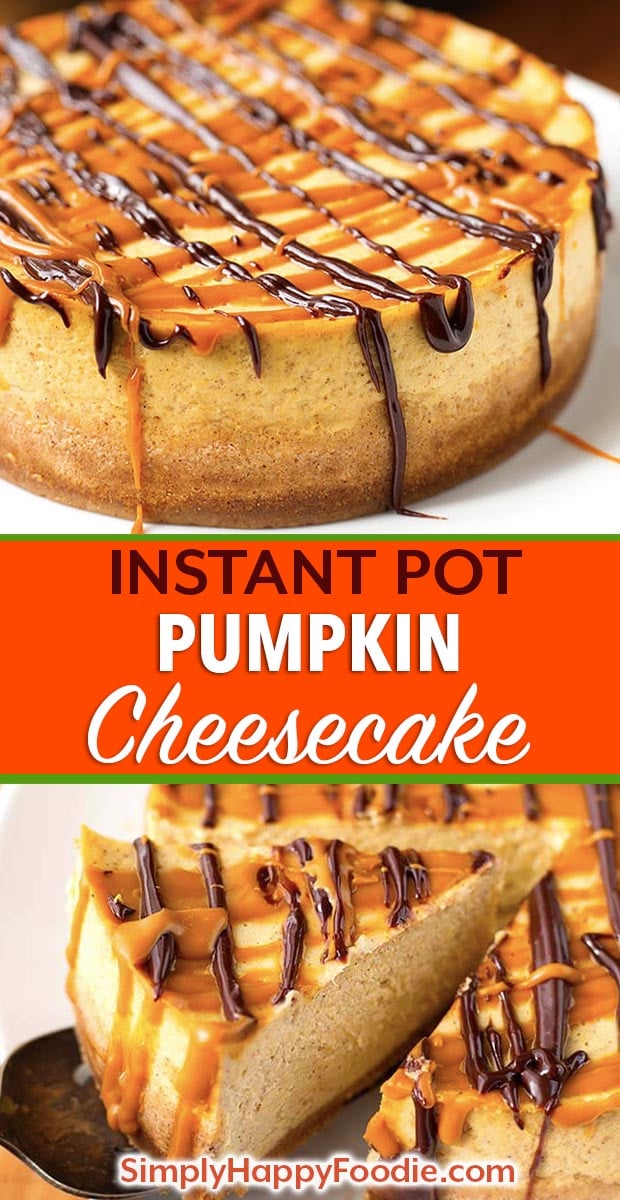
Instant Pot Pumpkin Cheesecake says "Fall is Here!" My recipe for this amazing pressure cooker pumpkin cheesecake is delicious, and has gained a lot of fans!
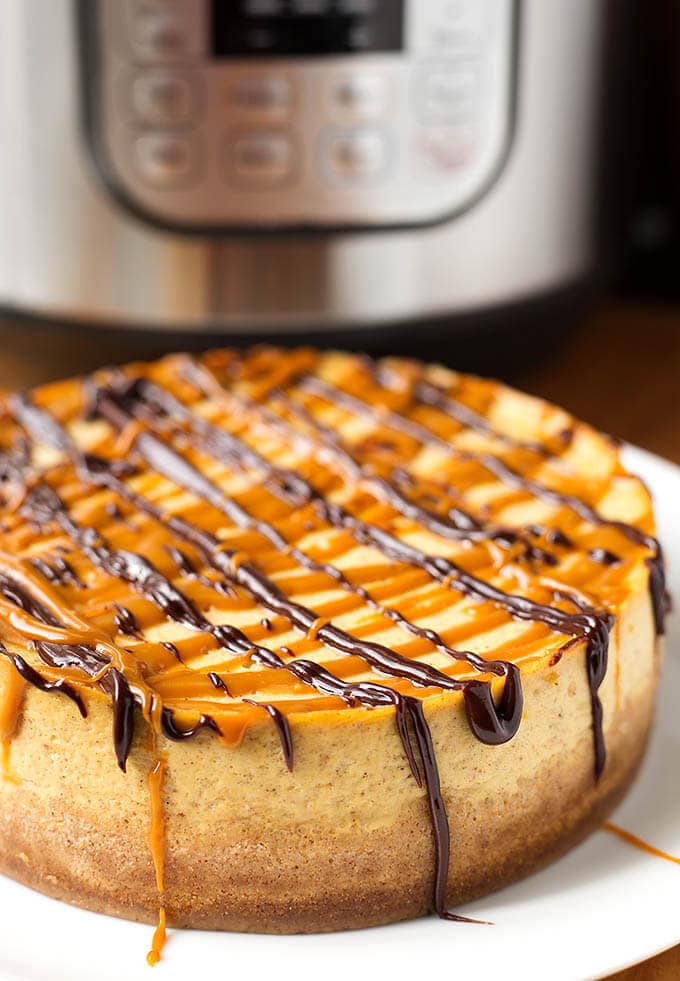
Instant Pot Pumpkin Cheesecake
Hello Fall! I'm a few days late, but very happy about the turning of the season! I love the cooler temperatures and changing colors of the leaves, the sweaters, boots, and of course, PUMPKIN EVERYTHING! Hey, at least I waited until it was actually Fall to post this Instant Pot Pumpkin Cheesecake recipe!
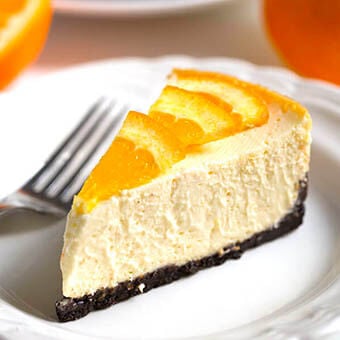
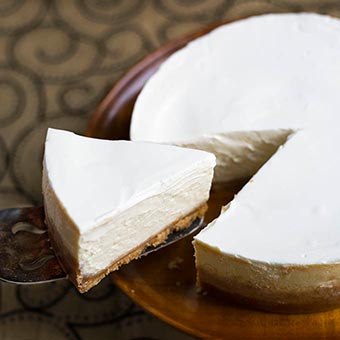
I adapted this pumpkin cheesecake from my Dreamy Orange Cheesecake recipe, which you also make in the pressure cooker. And which is, in fact, dreamy! And I can't leave out the most wonderful Instant Pot Chocolate Cheesecake. Can you tell I love cheesecake? I just don't like the kind you buy in the store. They seem dry and bland to me. I have yet to find a good store bought cheesecake.
The taste of this pumpkin cheesecake is fresh, and not too sweet. I use my Homemade Pumpkin Puree rather than canned pumpkin. It is so sweet and fresh tasting! It is perfectly fine to use canned. Just make sure it is pure pumpkin puree, and not pumpkin pie filling!
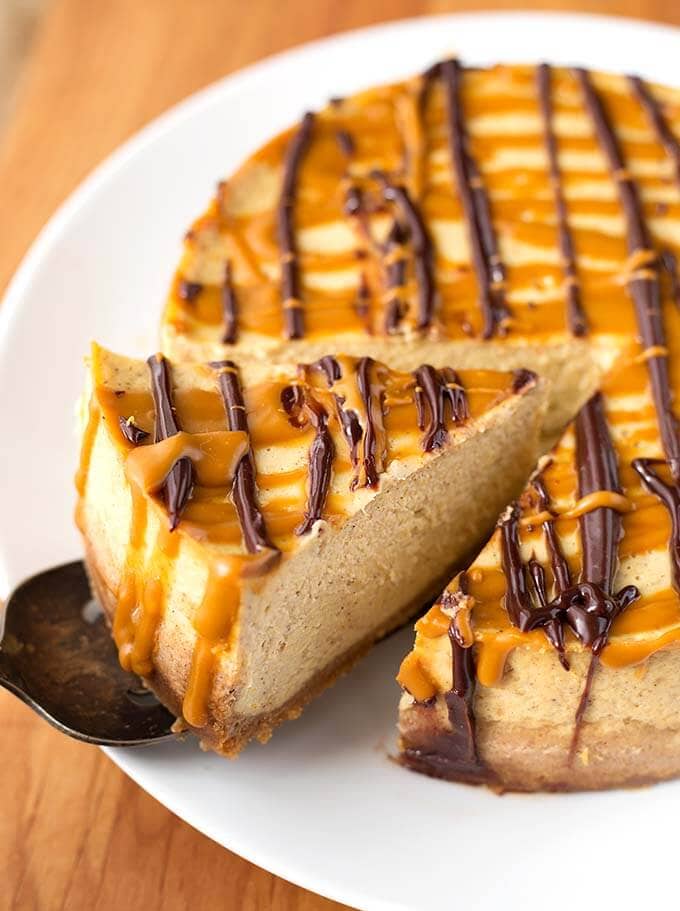
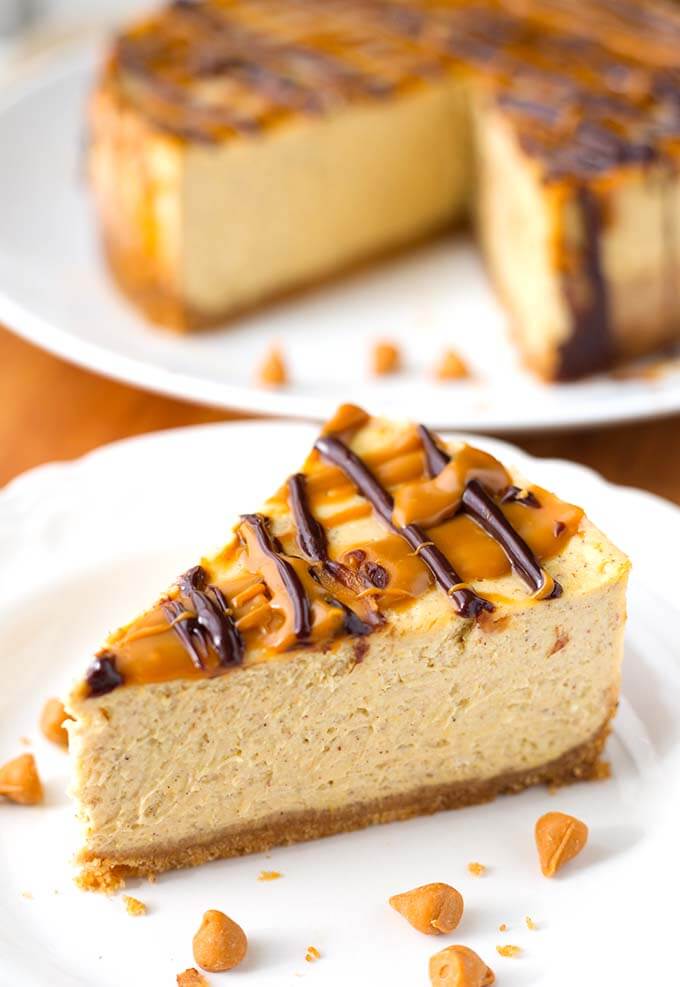
I think this Instant Pot Pumpkin Cheesecake has just the right amount of spice, so it's not going to taste like a pumpkin spice cheesecake. Actually, I think it tastes closer to a pumpkin pie, which is just what I was going for.But it's creamy cheesecake! It has a wonderful, mildly spicy, perfectly Fall flavor.
If you like it spicier, add more of your favorite spice! Also, this is not a really sweet cheesecake. I found that by adding a little optional brown sugar sweetens it a little more without going overboard.
We're going to the local corn maze and pumpkin patch this weekend! I wore a sweater today, and made Instant Pot Pumpkin Cheesecake. We are well on our way to a wonderful Fall! I hope you enjoy this Instant Pot Pumpkin Cheesecake as part of this beautiful season!
video
Watch me make this recipe (disclaimer: I'm not the greatest videographer! Lol!)
If you love cheesecake, try my other scrumptious recipes:
Instant Pot Chocolate Cheesecake
Pressure Cooker Dreamy Orange Cheesecake
Instant Pot New York Cheesecake

This Instant Pot Pumpkin Cheesecake is the right blend of spices and creamy sweetness. What a great Fall dessert! You will love making it in your electric pressure cooker. No water bath in the oven, and the texture is very creamy.
- 8 Graham Crackers
- 2 ½ Tpsp Butter melted
- 2 tsp Sugar*
- ¼ tsp Ginger Powder
- ¼ tsp Cinnamon
- 2 8oz Pkgs of Cream Cheese room temperature
- ½ cup Sugar
- 2 tsp Vanilla
- 1 cup Pumpkin Puree (pure pumpkin, not pie filling)
- ½ cup Heavy Cream room temperature
- ¾ tsp Pumpkin Pie Spice
- ¾ tsp Allspice
- ¼ tsp Cinnamon
- ¼ tsp Ginger Powder
- ½ tsp Nutmeg
- 2 tsp All Purpose Flour
- 3 Eggs room temperature
- ¼ cup Brown Sugar (in addition to the white sugar)
- Chocolate or Butterscotch Ganache Drizzle (instructions below)
- Whipped Cream (try adding a little cinnamon to your whipped cream!)
-
Use a 7 or 8 inch cheesecake pan (I use a 7” push pan, but you can use a springform pan as well. Whatever will fit comfortably in your pressure cooker)**
Spray the pan with baking spray. If you have parchment paper, cut a piece to fit the bottom of your pan and spray that too.
-
Put 1 ½ cups of water in the inner liner of the pressure cooker.
Put the trivet in the pot as well.
-
Usually made with aluminum foil, used to get the cheesecake in and out of the pot easily.
Fold a 28” length of foil along the long end 3 times. You will end up with a sling that is 28” x 3”
-
Break up and place the graham crackers in a food processor.
-
Add 2 tsp sugar and the ginger powder and cinnamon.
-
Pulse several times until the graham crackers turn into fine crumbs.
-
Add the melted butter and pulse several times to combine and soften the crumbs. You may need to scrape the bowl of the food processor and pulse a few more times.
-
Pour crust mixture into your prepared pan and use your fingers or the bottom of a small glass to press the mixture into place. Cover the entire bottom of the pan and come up the sides just a little. You do not have to come all the way up the sides. You want the crust to be about ¼” thick or so.
-
Put the pan in the freezer to chill while you prepare the cheesecake filling.
-
Clean the crust residue out of the food processor.
-
Add the cream cheese and sugar (and optional brown sugar, if using) and process until smooth and creamy.
-
Add the vanilla, pumpkin puree, heavy cream, spices, and flour. process until well blended and smooth and creamy.
-
Add the eggs last and pulse just a few times. Then take the bowl off of the food processor and gently mix by hand to incorporate the eggs. It is important that you do not whip or over mix the eggs as that will ruin the texture and density of your cheesecake!
-
Take the crust from the freezer and pour the filling into the pan.
-
Cover the pan with a paper towel, then with a piece of foil. Crimp the edges around the pan so it stays taut and secure.
-
Lay the sling out and set the pan on it, centered. Gather up the two ends and very carefully lift the pan and set it in the pressure cooker, leaving the sling with it. Just fold over the two ends of the sling on top of the pan.
-
Close the lid of the pressure cooker and set the steam vent to the Sealing position.
-
Press the Manual (or Pressure Cook) button and then the + or - button to choose 48 minutes.*** Make sure it is set to High Pressure.
-
When cook cycle ends, let the cooker naturally release pressure for 20 minutes. Then manually release any remaining pressure.
-
When the pin drops and it is safe to open the lid, do so carefully, facing away from you.
-
Gather up the two ends of the sling and VERY carefully lift the cheesecake pan out of the cooker and onto a cooling rack.
-
Leave covered for about 10 minutes, it will continue to cook, then carefully peel off the foil/paper towel.
-
The cheesecake is done if the center couple of inches jiggles just a little bit when shook. You don't want it too jiggly, but you do want some. It will firm up as it cools. If it is too jiggly, cover it back up and put back in to cook for 10 more minutes, with a 15 minute natural release (times will vary with many factors such as altitude and the size of pan, and the model of pressure cooker).
-
Let cool for about an hour, then put the pan in the fridge to chill for at least 4 hours before serving. I prefer to make my cheesecake in the evening and let it cool overnight.
-
Remove from pan and serve as is, or with whipped cream. You can also garnish with a chocolate ganache drizzle or a butterscotch ganache drizzle
-
This is not a specific recipe as you don't need much for a drizzle.
In a microwave safe bowl, add a handful of chocolate or butterscotch chips.
-
Add a couple teaspoons of heavy cream and microwave for 25 seconds.
-
Stir slowly at first so the cream doesn't fly out of the bowl. Then keep stirring and the ganache will come together. If it is too thick, add a little more cream, and warm for 10 seconds in the microwave again. Then stir more. It will come together! This is a very forgiving sauce!
-
*Note: The chocolate melts faster and easier than the butterscotch.
*This is not a really sweet cheesecake. If you like a sweeter cheesecake, add ¼ cup of brown sugar or white sugar to the filling.
**If you have a smaller pan that is taller (like a 6"x4"), increase the cook time by 5 minutes.
--- Original cook time has been updated to 48 minutes. I have great results at 40 minutes, but it seems many people need about 5 minutes more, so I just changed it. It might be because I am right at sea level.
----
If you have a 6" pan that is 3" tall, you might not be able to get all of the filling in the pan (in which case, shorten the cook time by 5 minutes). When I say that I mean that it puffs up in the cooker, and sinks back down as it cools. There is a chance it will puff up too high and spill out while cooking. You might have to leave out a small amount of the filling. I like to leave about 2 inches of headroom (I have not made this recipe in a 6"x3" pan). UPDATE: If you use all of the filling in a 6"x3" pan, cook for 10 extra minutes, and a 15 minute natural release.
***Altitude, etc. affects cook time, so adjust accordingly. If it is too jiggly when you take it out, just put it back in for 5-10 minutes with a 15 minute natural release, depending on how jiggly it is.
Resources to make Instant Pot Pumpkin Cheesecake
We are a participant in the Amazon Services LLC Associates Program, an affiliate advertising program designed to provide a means for us to earn fees by linking to Amazon.com and affiliated sites.


Vanessa
Am I able to use a hand mixer rather than food processor for the cheesecake mixture? Or will it change the texture?
Sandy
Yes, just try not to over mix it.