This post may contain affiliate links. Please read our disclosure policy.
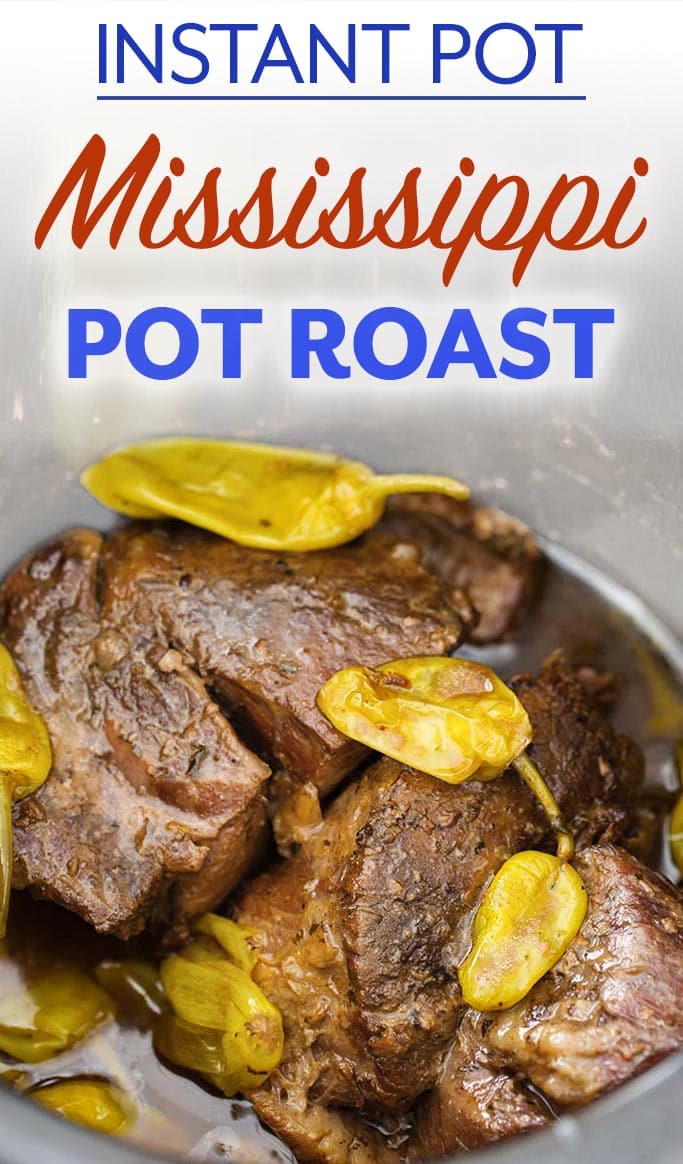
Instant Pot Mississippi Pot Roast is the perfect Instant Pot Beginner recipe! Probably the number one, most flavorful pot roasts of all time is the pressure cooker Mississippi Pot Roast. Using a nice chuck roast and yummy seasonings, this is an absolute classic pot roast with the most flavor of any I have ever had!
Originally published on 12/13/17
Instant Pot Mississippi Pot Roast
If you are looking for an easy, first recipe to make in your Instant Pot, this is a great one! Mississippi Pot Roast is a “Dump and Start” recipe (unless you want to brown it first), and is super delicious!
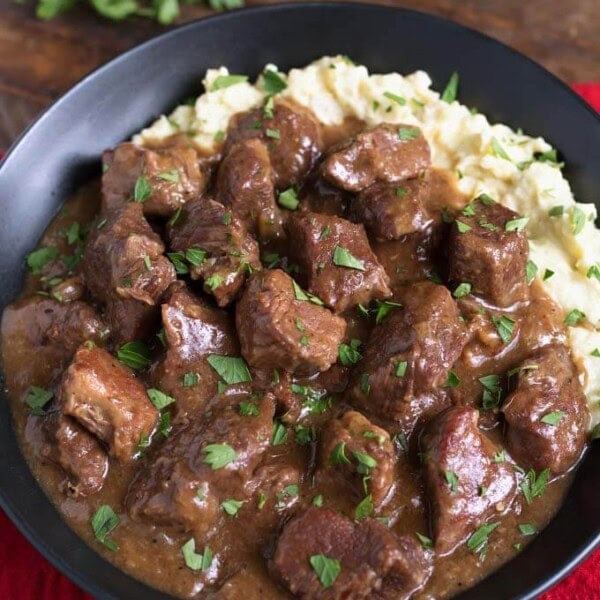
This is truly the most flavorful pot roast I have ever made. Faster than the oven or crock pot, and is incredibly delicious. I make this Instant Pot Mississippi Pot Roast several times a year, because the guys (and I) enjoy it so much!
Cooking a pot roast in your electric pressure cooker is a great time saver!
You get a tender, flavorful pot roast in a little over an hour, versus the 3 to 4 hours it normally takes in the oven, or 8 hours in the crock pot. And it tastes just as good!
I put my own little spin on it, and add onion, which I think add so much more flavor to the recipe.
Can I use a frozen roast?
Yes, however, since you can’t cut the frozen roast into chunks, the cook time will be longer. Still less time than in the oven or slow cooker!
What about the salt?
- Mississippi Pot Roast can be a bit salty, so here are some tips to help with that:
- Use unsalted butter
- Use low or no sodium broth (or use water).
- Try to find low sodium ranch dressing mix, or make a batch of my Homemade Ranch Dressing Mix and don’t add salt (or use less).
- Rinse off the pepperoncinis and use half the amount of the juice from the jar. You can always add more after cooking if you want to.
Tips for making the best Instapot Mississippi Pot Roast
- This can be a salty meal, so use unsalted butter, and low or no sodium broth (or use water).
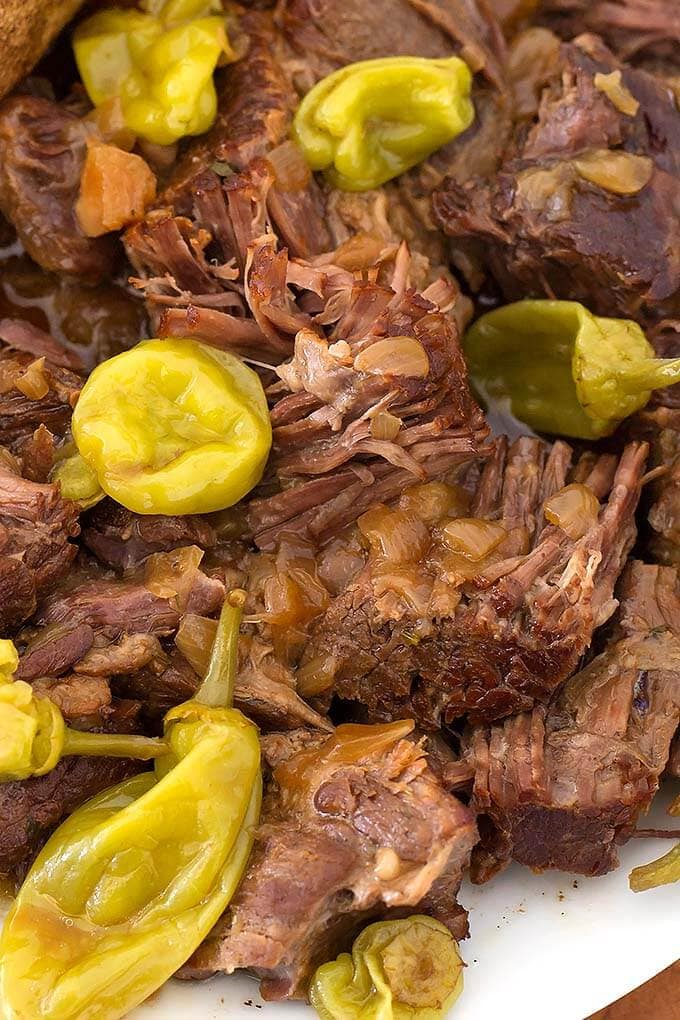
- You can buy the pepperoncinis whole or sliced. I use whole ones so Paul can pick them out, lol! The “original” variety aren’t hot, but do add a salty and tangy flavor.
- Use a well marbled chuck roast for the most flavorful and tender pressure cooker Mississippi Pot Roast.
- Browning the roast on each side first does increase the flavor, but isn’t necessary. If making this as a beginner, just dump it in and start the pot!
Robin Chapman, the original creator of the Mississippi Pot Roast, likes this pot roast in sandwiches! We use potato buns and they are so delicious!

Instant Pot Mississippi Chicken
Instant Pot Simple Pot Roast
Instant Pot Bone-In Ham
Instant Pot Creamy Mashed Potatoes

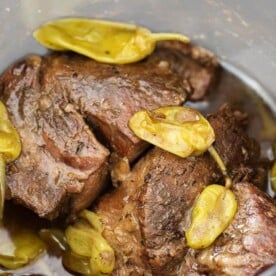
Instant Pot Mississippi Pot Roast
Ingredients
- 3-6 lbs Chuck Roast, cut into 1 pound pieces of even thickness
- 3 Tablespoons Vegetable Oil
- 1 small Onion, chopped (optional, if you don't use the onion, omit the veg oil, too)
- 9 Pepperoncinis, whole or chopped
- ½ cup Pepperoncini Juice from the jar
- 1 ½ cups Low Sodium Beef Broth, (or water)
- 1 (1 oz) packet Dry Ranch Dressing Mix
- 1 (1 oz) packet Au Jus (or packet of brown gravy mix)
- 4 Tablespoons Butter, unsalted
For Gravy
- 3 Tablespoons Flour
- 3 Tablespoons Softened Butter, unsalted
Instructions
- Turn pot on Sauté mode (normal heat). When the display reads "Hot" add the oil.
- When oil heats up, place meat in one layer into the pot and don't move it for 5 full minutes (Don't brown for less than that).
- Turn meat over and cook for another 5 full minutes.
- Remove the meat to a dish and cover with foil to keep it warm.
Deglaze the Pot
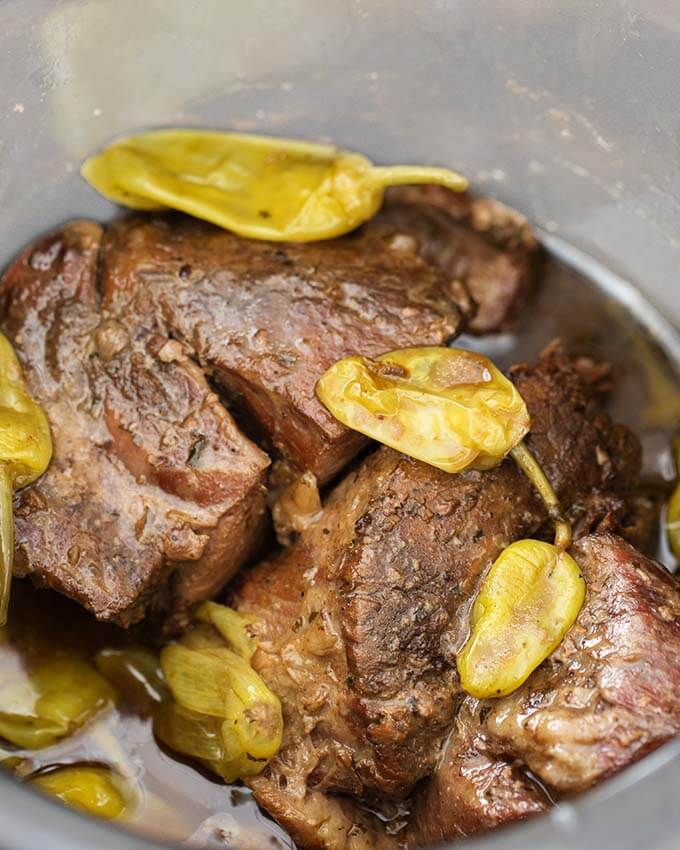
- Add the onion and a bit of the beef broth to the pot and stir to loosen the brown bits from the bottom of the pot. As you stir, scrape the bottom of the pot with a wooden spoon until the bottom is free of all of the stuck on brown bits.
- Add the pepperoncinis and their juice, beef broth, au jus and ranch packets, and butter. Stir to combine.
- Turn off the sauté mode.
Pressure Cook the Roast
- Add the meat back into the pot.
- Close lid and set the steam release knob knob to the Sealing position.
- Press the 'Pressure Cook' or 'Manual' button (or dial) then the +/- button to select 60 minutes. High Pressure. It will take several minutes to build pressure.
- When the cooking cycle ends, let the pot sit undisturbed and count up to 15 min (15 minute natural pressure release, or NPR).
- After the 15 minute NPR, turn off the pot and manually release the remaining pressure by turning the steam release knob to the Venting position.
- When the pin in the lid drops back down, open the lid.
- Remove the pot roast to a plate and cover.
Make the Gravy
- Turn the Sauté function back on.
- Mix the flour and softened butter together until well combined.
- When the liquid is starting to simmer, add the mixture to the pot, stirring well until thickened. Then turn off the pot and add the roast back in.
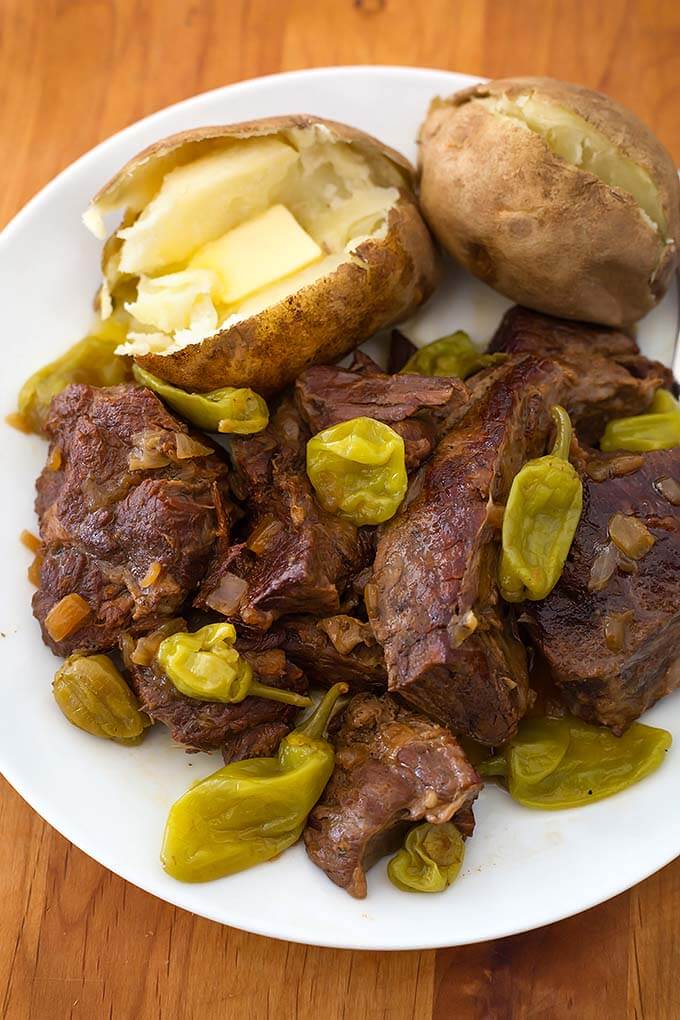
- Enjoy with mashed or baked potatoes, or over rice.
Notes
Nutrition
Nutrition information is automatically calculated, so should only be used as an approximation.
Pin This pressure cooker Mississippi Pot Roast Recipe


This was amazing, but did anybody else find this excessively salty? I followed the recipe exactly. Used a 3 point something pound roast. Served over rice. Don’t get me wrong, the flavors were SO GOOD!!! And I’ll definitely make it again, but maybe 1/2 packet of each seasoning, instead of a full packet of each? Any other suggestions to cutting the salt? If I were to add potatoes and carrots, when/how do you suggest doing that in an instapot? Thank you for this recipe!
Be sure to use unsalted butter, and either water or low sodium beef broth. You can rinse off the pepperoncinis and use less of the broth. Use less of the seasoning packets, as you mentioned. To cook veggies with this, add them after the roast cooks. Take out the roast and cover it to keep it warm and from drying out. Add the veggies and pressure cook for 3 to 5 minutes, depending on how large you cut them.
I try to keep things as organic and non-processed as possible, so I’m curious, is there a suggested alternative to packet brown gravy mix?
You could melt butter in a skillet, add flour and whisk, then stir in a rich beef broth. Season as you like. This is a simplified version.
Love this recipe! Make it sooo often in the fall and winter months! Thank you!!
This has always been my favorite slow cooker recipe and I was excited to find your IP version. My 15 year old daughter bought me an IP for Christmas and I’ve made several of yours to recipes it in. I don’t know why it took me so long to make this one. I love how you incorporated the pepperoncini juice into the sauce, I always added a little bit before but really liked the tangy zest it added to the meat. I never used au jus in my other recipe (onion soup mix instead) but definitely liked the gravy much better! We generally eat this on slider rolls (the Hawaiian type) with provolone cheese, which is what did this time but the gravy, OMG sooo yummy, I was worried it wasn’t going to work out with the softened butter and flour (I was worried it would be lumpy) but it was AWESOME! My daughter said this would be good over rice, egg noodles or mashed potatoes. There’s only two of us in our family so we have plenty leftover to try it on top of one of those for a different twist. Thank you so much for sharing your recipes with us, they’re so easy to follow and everything I’ve made has been fantastic!
This is my ultimate favorite Instant Pot recipe by far! I make this at least once a month and for Christmas we did 2 huge pans of it (3 big Angus roasts from Sam’s club). I just add in veggies at the end… toss in some cubed potatoes, carrots and green beans and put the lid back on and cook for 20 mins. It never fails to disappoint and the meat is super tender. I love the gravy!
I made this last night and agree with all the other reviewers, this was a great recipe! I made “smashed potatoes” for a side. The only problem, I had to guess on the measurements since I used a 2-lb roast and not the 3-6 lb. as suggested. So mostly used 1/2 of each additional ingredient. I used 7 pepperoncini, which I forgot to rinse off, but I did squeeze the juice out of them first. (FYI: aim the pepperonis with stem side up unless you want an eyeful of the juice! I had a near mishap with that.)
Anyway, my favorite part was the gravy. Unbelievably deeee-licious. Really complimented the meat and the potatoes.
I
I’m embarrassed to say that mine did not turn out as well as I expected. I’m sorry to say it was a bit tough and way too salty. I am a newbie to IP so I tried to follow your recipe closely, and instead of the Au Jus I used a packet of 30% less sodium brown gravy mix. I also used the Low Sodium Beef Broth and unsalted butter. I cut my 3.3 lb chuck roast into 3 equal size pieces, but it was quite thick. I selected 60 minutes at high pressure and after the cycle ended, I waited 15 minutes NPR. The meat did not break up easily with a fork as I expected and, as I said, it was way too salty. What can you suggest I do differently next time? Could I have put the roast back into the IP and cooked it longer? How can I reduce the amount of salt?
Hi, sorry your experience wasn’t as great as it could have been. With thicker pieces of meat, cook longer, like 15-30 minutes more. It’s good you found the less salt version of the gravy and broth, butter. There is also a less sodium ranch out there too. I would add some water, maybe 1/2 cup, to help counteract the saltiness if needed.
Just got this recipe. Sounds good. I just wanted to say I have been using my Instant Pot since February and always like dump and go recipes. This one sounds pretty good but there are a lot of ingredients I would have to buy before I could try it. Thanks anyway.
When you do try it, you can do the dump and go version. I think you will really like this recipe!
There are no words to describe how delicious this recipe is!! Browned the meat and followed everything to a T. My husband said “life changing recipe” —it’s so good. 🙂
Great flavor but I changed the cook time. High pressure for 25 minutes with NPR until the pin dropped (about 30 minutes). Super tender and perfectly cooked potatoes (I put 5 whole reds on top). Made a little slurry with cornstarch instead of flour too. I will definitely make this again!
I made this last night and it was delicious! I did not put in the peppers as I can’t eat spicy food and did not want to take a chance. I did not have any low sodium beef broth so I used white wine. Other than that I followed the recipe as written. I don’t like overly salty food and don’t use much in my ordinary cooking. So I was a bit concerned using 2 flavor packets both of which have a lot of salt. But even though this dish tasted salty it had a rich depth of flavor to it which I found very agreeable. I had a 3lb. roast and did not bother cutting it apart and it came out perfectly done at 60 minutes pressure cooking plus 15 minutes before doing the pressure release. Thank you for posting this recipe along with all the tips for someone making this for the first time. (The stars do not seem to be working but I would give it 5 stars.)
Sandy – so glad I found your web site! I just received my Instant Pot today. . . and am ready to make my first meal.. I’ve chosen your Mississippi Pot Roast for this inaugural, and I don’t want to make a mistake – – so I have two questions for you.
First, the largest pot roast I could find was 2.48 lbs. (which is way more than just my husband and I can eat) but the questions is – should I reduce the 60 minute cooking time, so that it won’t get over done. Or should I reduce any of the other ingredients to compensate for the smaller size of the roast?
Second, your recipe card calls for a 1 oz pkg of Ranch Dressing. All the ones I could find in the grocery store were .4 oz. Should I use 2 to 2 1/2 for these point four ounce packages? I don’t want to over season – so please let me know.
Many thanks for taking the time to reply. It would be great to have an initial success with my new toy. 🙂
Hi June! If you are cutting the roast into 1 lb chunks as directed, you can use a smaller (or larger) roast. It won’t matter. I haven’t seen the smaller packets of ranch mix or au jus, but you can probably get away with using 1 packet. Or 2 Tbsp of the mix.
Thank you so much for this lovely recipe! 5 STARS all the way! (tried clicking the five stars but its not letting me, even after turning off ad blocker but 5 stars from this house!)
We made this the first time as stated….browning the meat etc and with au jus. That time we had my stepchildren visiting and my son and they all THREE loved it (which was unheard of this whole summer LOL) the 2nd time I made it for hubby and I and I think I added probably 15-20 Pepperoncinis because hubby and I both really liked them. We also used the brown gravy instead of the au jus as that’s what we had on hand. It did make it a bit spicier than I liked so I’ll probably do more than the 9 peppers but not the rest of my pepperoncinis jar LOL! This round I also did the dump and go version and I forgot to cut the meat (oops) and I missed the part about the 80 minutes eek but it still turned out great!
And now I’m getting ready to make this a THIRD time 🙂 I got some groceries and gave the hubby three options and he’s like MORE Mississippi roast please LOL! So I’ll be making it with au jus this time, probably 12 or so peppers and seeing what happens…Oh and I won’t forget to “cut” the meat into 1 pound chunks either LOL but I’ll probably go for the dump and go 😛 (increasing my time like I should have the last time).
Thank you for a LOVELY amazing recipe (that is super forgiving!) Its added to our must have/favorites now! 😀 And I appreciate the instructions you’ve given other reviewers to add carrots/potatoes to it! 🙂
That’s great, Chelsea! I’m so glad it works for your whole family!
First let me say thank you for sharing this recipe! Thank you!! … I usually hate it when someone comments on a recipe and gives 5 stars but then says they changed a million things about it, because then it’s really not your original recipe they are commenting on!…. That said, I’m guilty of changing 2 things (but not the first time)… We tried this recipe twice and both times were “Absotively Posilutely” amazing!! (My saying, Not a typo)… First time followed your recipe to a T, but the second time we switched it up a bit by using whole as well as sliced Jalapeno peppers instead of Pepperoncinis and replaced ALL the liquid with liquid from the Jalapeno can/jar. (So in other words 1 cup of juice from the Can/Jar of Jalapeno’s) and kept everything else exactly the same… I don’t eat meat, (Or Jalapeno’s!) so can’t attest to how this tasted either time, but will tell you the family just can’t get enough of it!!!… Thank you again for sharing this recipe and I will be checking out some of your others as well… (PS., Doesn’t look like my star rating is working, but 5 stars all the way!!)
Hi Kris! That sounds amazing! I haven’t been brave enough to try an all-jalapeño version! My hubby can’t take the heat. Thank you so much for your review (stars are working now). I also prefer a true to the written recipe review, however, the fact that it is easy for someone to alter makes them happy!
Hi Sandy,
Here we go again!… This time with a bigger roast so they can have even more leftovers!… Hubby wants your original recipe this time (no jalapenos) but wants to add a large bag (or 2 small bags) of baby carrots (No potatoes)… From what I am seeing while scrolling through the reviews it looks like you say to take the roast out when done and cover it with some of the liquid and foil and put aside… Then add the carrots back to pot and cook on High pressure for 3 minutes…. My question is… Would this be okay to do for the amount of carrots I just mentioned without potatoes? Or do I need to change the time or setting because it’s just carrots?… Again, Thank you so much for sharing this recipe!
I would do 3 minutes, even for 2 bags. Because each baby carrot is so small, you don’t want to cook them any longer unless you like them very soft (in that case do 4 minutes).
You may have answered this question, but there are at least 3 million and one comments to wade through so I’m asking so I dont have to do that…😬
From frozen, how long should I set the cook time?
90 minutes if you don’t cut the roast into 1 lb chunks.