This post may contain affiliate links. Please read our disclosure policy.
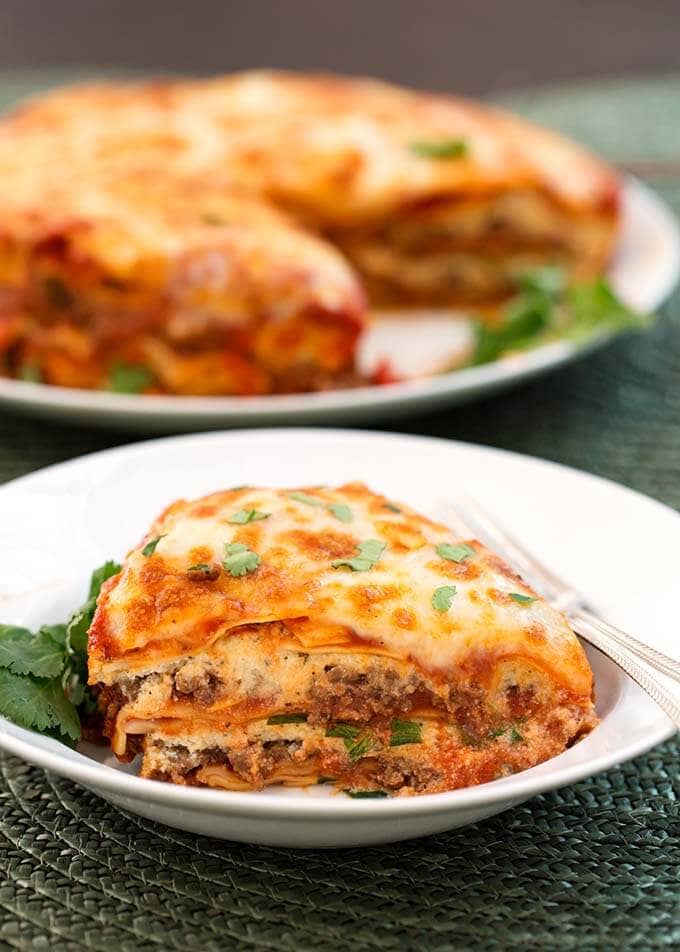
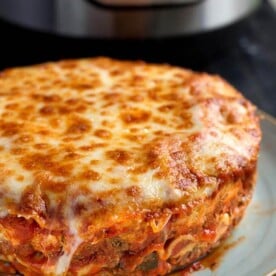
Instant Pot Lasagna is the easiest lasagna recipe! It tastes delicious, and you can customize it to your taste, adding any of your favorite ingredients!. Did you know it is very easy to make lasagna in the Instant Pot? You don’t have to boil the noodles first, so that’s a win in my book! If you are in the mood for some tasty Italian pasta, make this pressure cooker lasagna recipe.
Originally published Jan 19, 2018
Instant Pot Lasagna
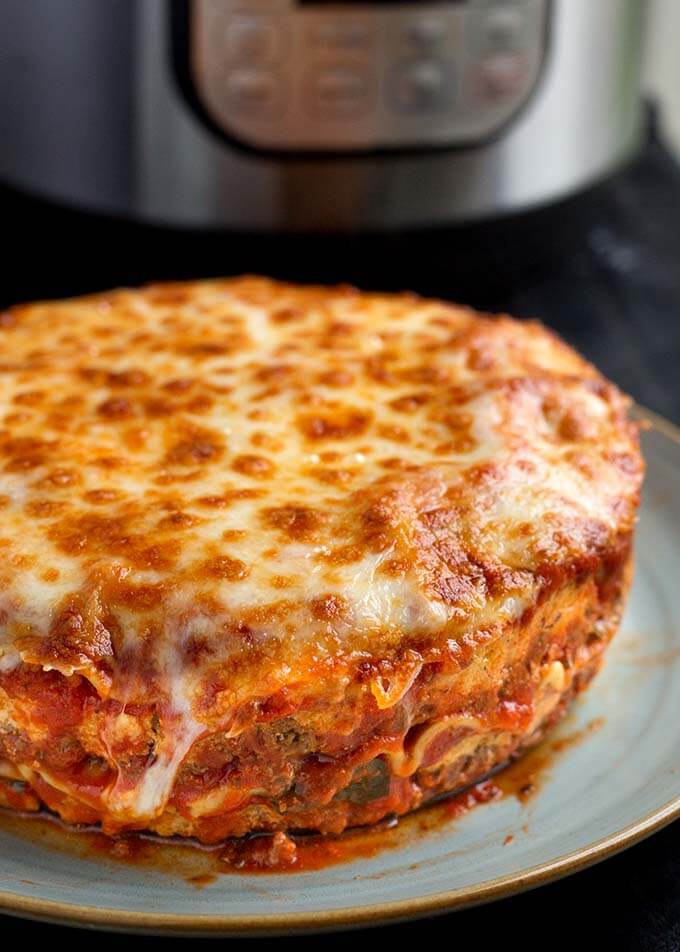
This pressure cooker lasagna recipe is one of my most popular recipes! Often copied by others, but this is the original version of this recipe. The favorite Instant Pot lasagna recipe of thousands who have made it! Thank you all for your wonderful feedback and comments!
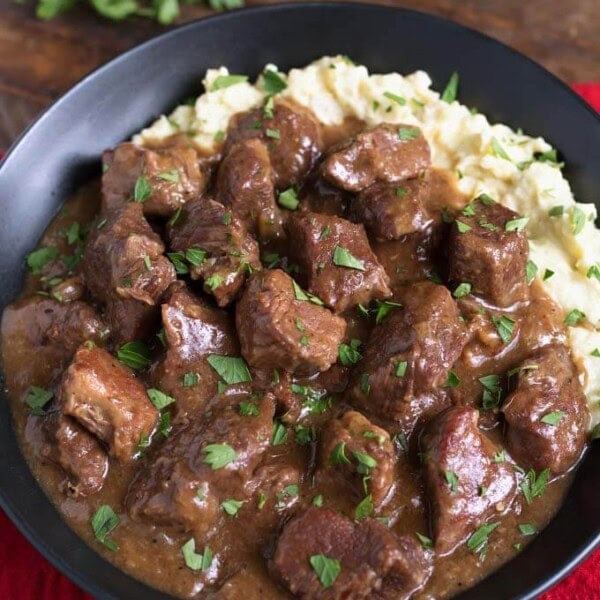
My husband, Paul makes a fantastic lasagna! He adds spinach, mushrooms, and other good stuff to it. His recipe makes a huge pan of it, and it lasts us for days! I wanted to make some in my Instant Pot electric Pressure Cooker, and see if it would turn out as good as his. And would it be any faster?
Well, he doesn’t cook his noodles, so I didn’t want to cook mine, either. I found some no-boil noodles that work perfectly (regular lasagna noodles worked as well, but the results were best when I soaked them first in very hot water for 15 minutes.).
He does a lot of chopping, and I wanted an Instant Pot Lasagna recipe where I could get good flavor without so much chopping. I turned to my pantry for some seasonings. Garlic powder, onion powder, and a few others did the trick! Saved some time there.
I decided to use my favorite jarred marinara sauce in this pressure cooker lasagna. When I have it, I use my homemade Instant Pot Marinara Sauce. Perfect! The Instant Pot Lasagna was coming together nicely! Here’s a summary of how I made it:
How To Make Lasagna in an Instant Pot Pressure Cooker
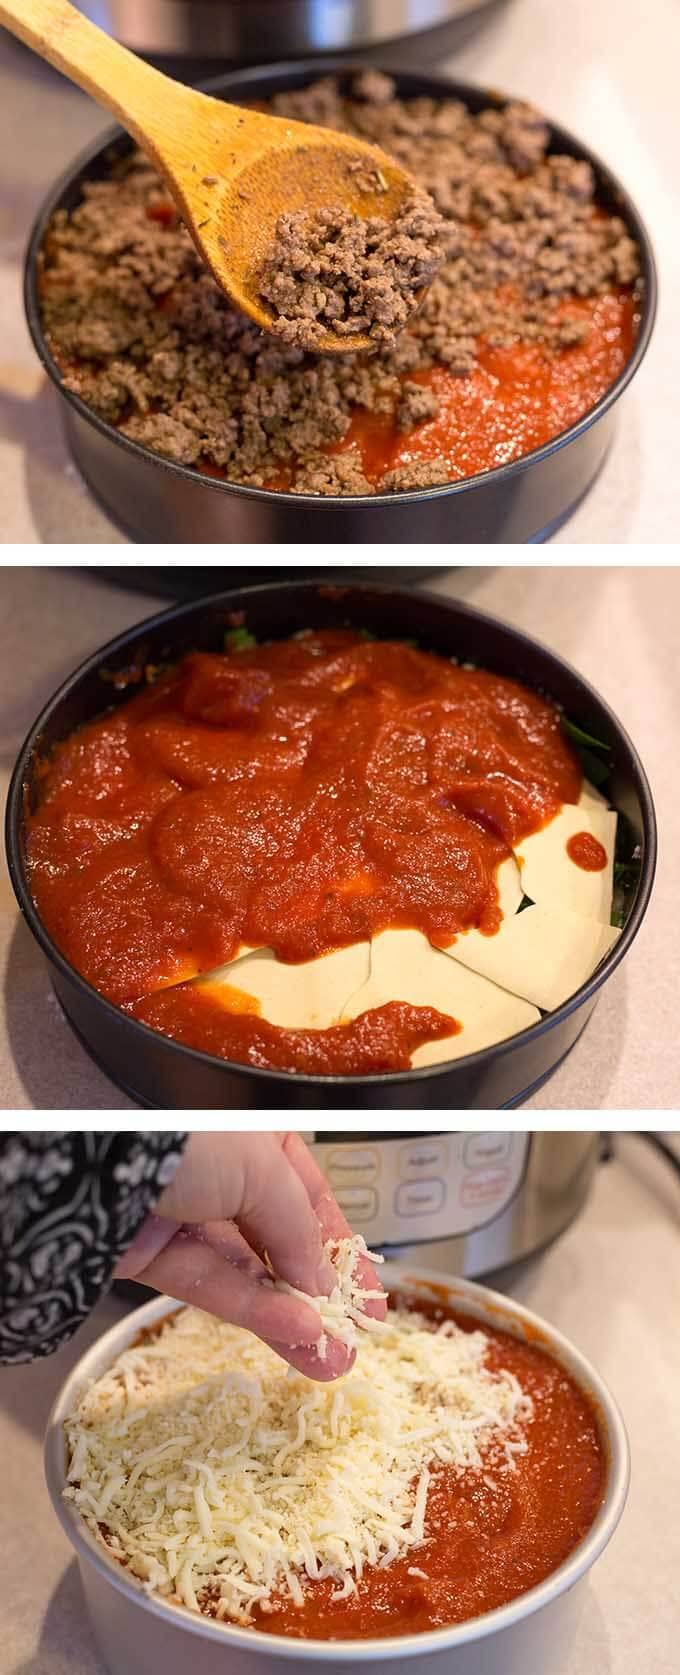
- Spray a 7″x3″ springform pan with cooking spray.
- Layer uncooked noodles in the bottom.
- Layer sauce, meat, and cheese mixture.
- Repeat layers two more times.
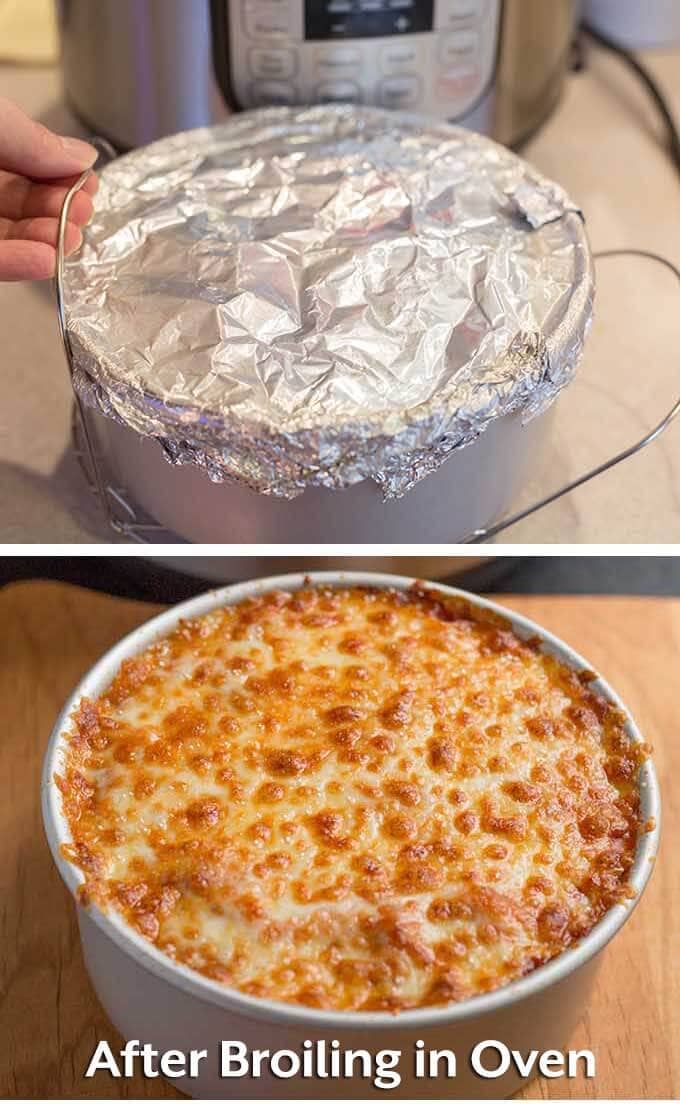
- Cover with a piece of sprayed foil, set on a trivet with handles (or use a sling) and put it in the pot.
- Pressure cook and let it naturally release for 10-15 minutes.
- Broil the top of your Instant Pot Lasagna to brown the cheese.
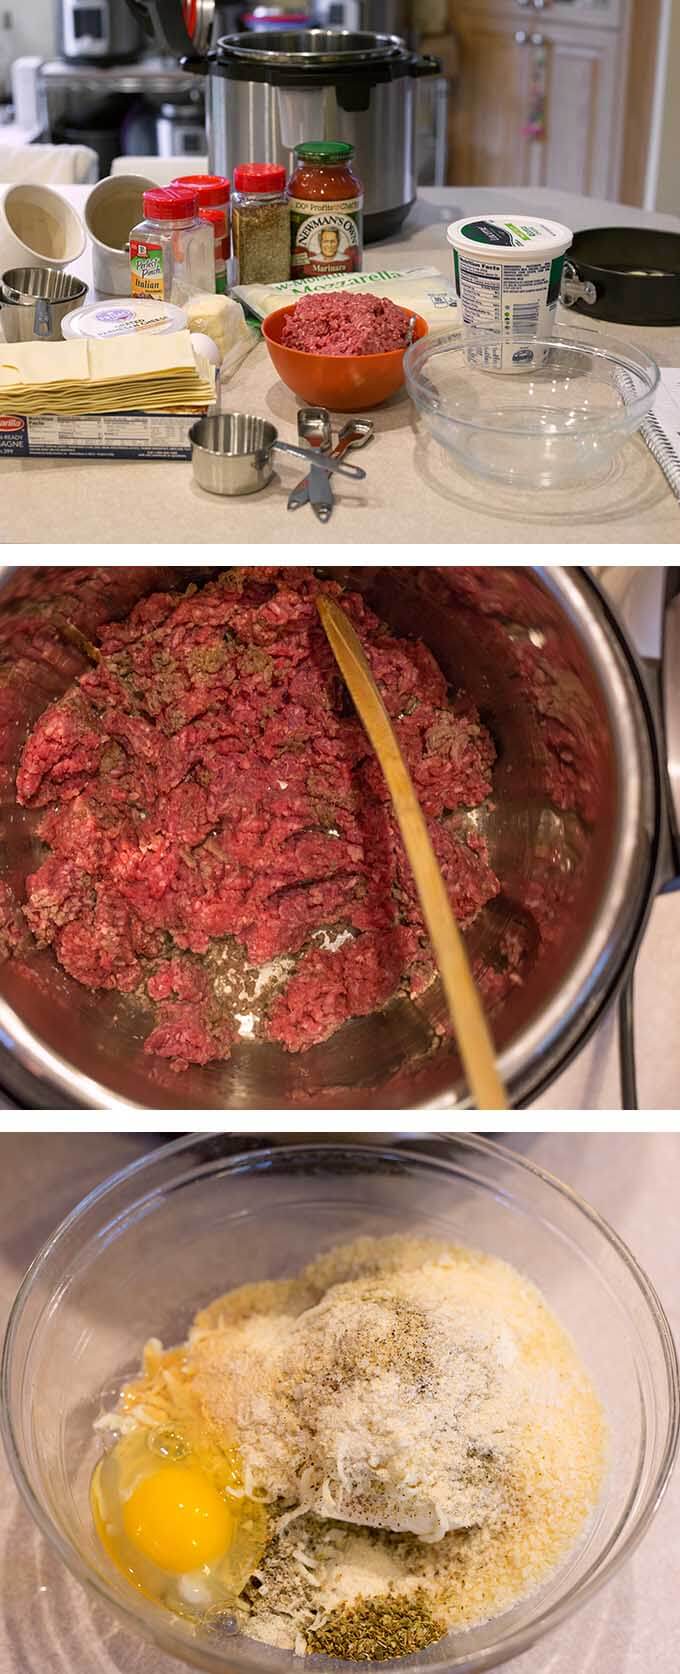
• Gather all of the ingredients and kitchen tools you will need.
• Cook the Meat with some seasonings so it isn’t bland.
• Prepare the cheese mixture.
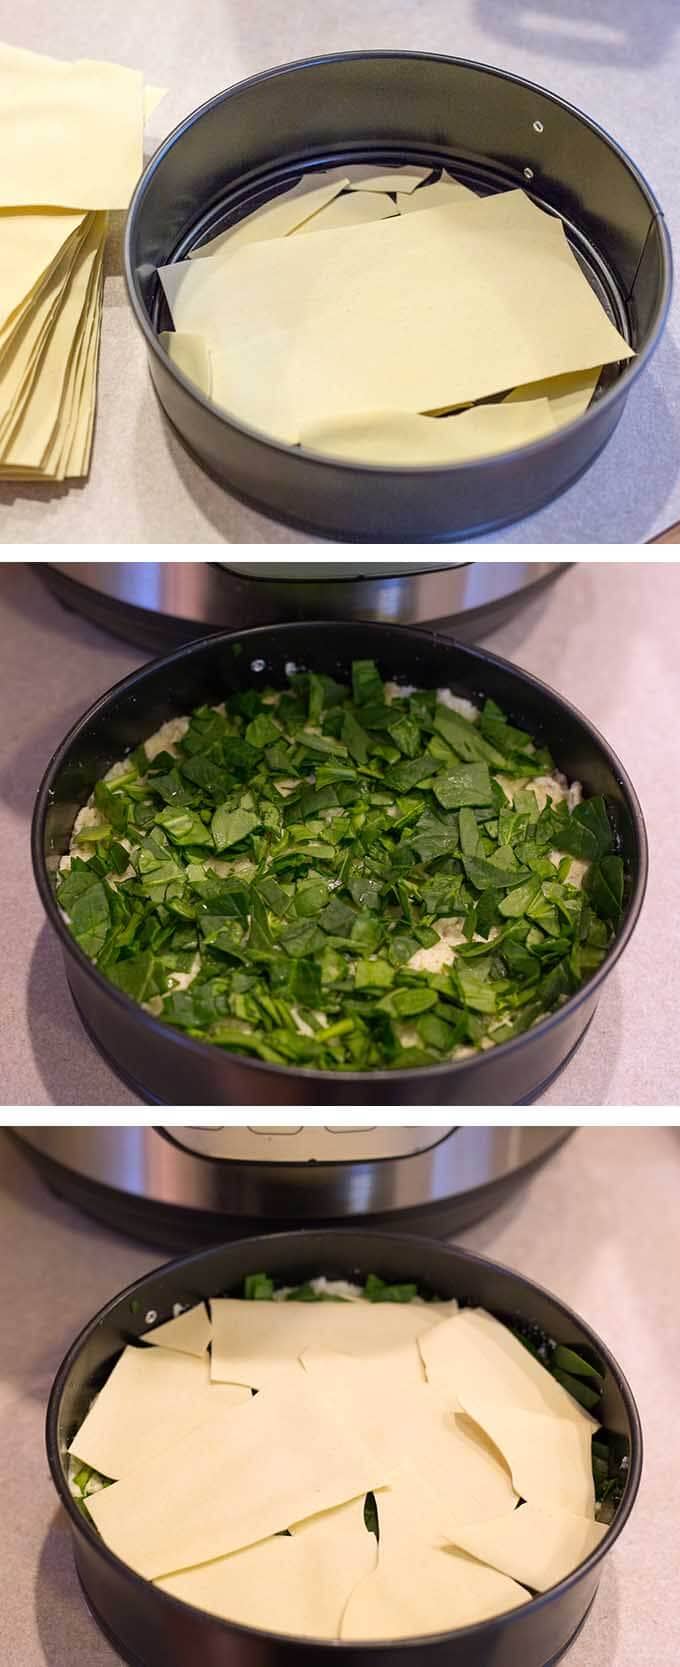
• In a 7″x3″ springform or push pan, start the layering with the no-boil noodles, which you will need to break apart to fit the shape of the pan.
• Next, layer 1/3 of the sauce, 1/2 of the meat, then 1/2 of the cheese mixture, and the spinach (optional).
• Start again with another layer of noodles, 1/3 sauce, 1/2 of the meat, 1/2 cheese mixture.
• Then noodles, sauce, and top cheese layer.
• Cover with a piece of sprayed foil, set on a trivet with handles (or use a sling) and put it in the pot. Set the cook time and let it naturally release for 10-15 minutes after pressure cooking.
• Broil the top of your Instant Pot Lasagna to brown the cheese*.
*Broiling is an optional step, and you can brown the cheese as much as you like.
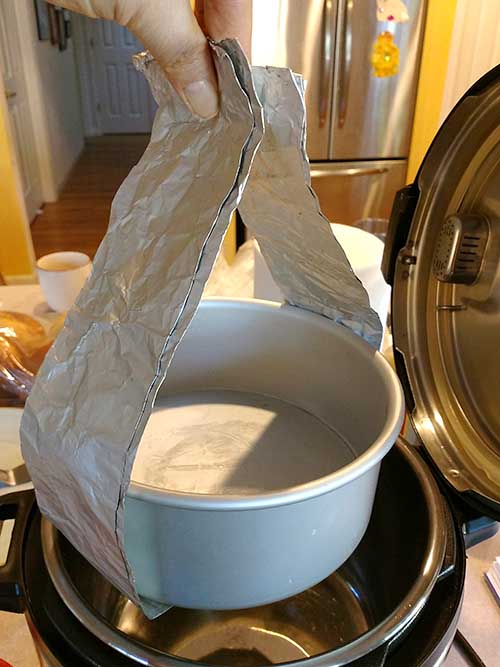
This is what a foil sling looks like, if you need to use one. Take a 24 inch length of foil and fold it over 3 times the long way. You will have a sling that is 3″x24″.

Instant Pot Easy Lasagna Soup
Instant Pot Spaghetti and Meatballs
Instant Pot Marinara Fresh Tomato Sauce
Instant Pot Cheesy Meaty Shells
Instant Pot Zuppa Toscana (Sausage Potato Soup)
If you make this delicious Lasagna in the Instant Pot, please let me know. Just leave a comment with a star rating below. I’d like to know how it worked for you.

Instant Pot Lasagna
Equipment
Ingredients
Meat Mixture
- ½ lb Lean Ground Beef (85% to 90% lean) You can use all ground beef
- ½ lb Ground Italian Sausage (you can use all sausage)
- ½ teaspoon Coarse Salt (1/4 tsp table salt)
- ¼ teaspoon Pepper
- ½ teaspoon Onion Powder
- ½ teaspoon Garlic Powder
- ½ teaspoon Italian Seasoning
Cheese Mixture
- 1 cup Ricotta Cheese (or Cottage Cheese)
- 1 Egg
- ½ cup Mozzarella Cheese, shredded
- ½ cup Parmesan Cheese, grated
- 1 ½ teaspoon Garlic Powder
- 1 ¼ teaspoon Onion Powder
- 1 ¼ teaspoon Italian Seasoning
- ½ teaspoon Oregano
- ½ teaspoon Salt (if your pasta sauce is salty, decrease to 1/4 tsp)
- ½ teaspoon Pepper
- ¼ cup Chopped Fresh Parsley
Remaining Layers
- 1 (24 oz) jar Pasta Sauce (about 3 cups) (I prefer marinara, or use your favorite brand)
- ½ cup Chopped Spinach Leaves, optional (fresh, or frozen, thawed)
- 5-6 No Boil Lasagna Noodles (or regular uncooked lasagna noodles that have been soaked in very hot water for 15 minutes)
- ½ cup Mozzarella Cheese, shredded
- ½ cup Parmesan Cheese, grated
Instructions
Cook Meat
- Set pot to Sauté and add the beef, sausage, salt, pepper, onion powder, garlic powder, and Italian seasoning. Cook, stirring, until the meat is cooked.
- Remove meat, drain, and set aside. Clean out pot and add 1 ½ cups water to it.
Mix the Cheese Mixture
- In a mixing bowl combine the ricotta, egg, mozzarella, parmesan, garlic powder, onion powder, Italian seasoning, oregano, salt, pepper, and parsley. Use a fork to mix thoroughly. Set aside.
Make the Lasagna
- In a 7"x3" or 6"x3" springform or push pan, make a layer of the no-boil noodles by breaking them and fitting them like a mosaic to cover the bottom of the pan.
- Spread ⅓ of the pasta sauce over the noodles, covering them all.
- Spread ½ of the meat mixture over the sauce evenly.
- Spread ½ of the cheese mixture evenly over the meat.
- Sprinkle the spinach (if using) over the cheese mixture evenly.
- Add another layer of noodles, press down on them a little.
- Add another layer of ⅓ of the sauce.
- Add the second half of the meat.
- Add the second half of the cheese mixture.
- Add another layer of noodles, the last ⅓ of sauce, ½ cup of mozzarella, and ½ cup of parmesan.
- Spray a piece of foil with nonstick spray and lightly cover the pan with the foil, enough that water can't get in.
- Set the pan on a trivet with handles and lift them into the inner pot that has 1 ½ cups of water in it. You can also use a sling to set the pan on the trivet in the pot.
- Close the lid and lock in place. Turn the steam release knob to the Sealing position.
- Press the Pressure Cook or Manual button (or dial) and choose 24 minutes. High Pressure. It will take about 5 minutes or so for the pot to come to pressure.
- When the cook cycle has ended, let the pot sit undisturbed for 10-15 minutes (10-15 minute Natural Release). Then, turn the knob to the Venting position to release any remaining steam.
- When the pin in the lid drops down, open the lid. Use silicone mitts, sling, or good pot holders that can get wet to lift the rack with the hot pan out of the pot to a cooling rack. Be VERY careful as it could slip off the rack.
- Carefully remove the foil. Turn on your broiler to 450° with the oven rack in the middle to top ⅓ position in the oven.
- Set the pan on the oven rack and let the cheese on top brown to your desired amount. Watch it closely as it doesn't take very long. Every oven is different!
- Let the lasagna rest for a few minutes before releasing from the pan. This will help it maintain its shape and cool down just a bit.
- Carefully (pan and lasagna very hot) release the lasagna from the springform pan while it is on a plate.
- If you used a push pan, set a large can of soup or veggies on a plate and set the push pan on top of the can. gently, and carefully push the sides of the pan straight down. Wear oven mitts or some kind of hand protection. The pan and the lasagna will be very hot.Then slide another plate under the lasagna. You might need to use a spatula to help slide it over.
- Serve with salad and some crusty bread!
Notes
Nutrition
Nutrition information is automatically calculated, so should only be used as an approximation.
RESOURCES TO MAKE Instant Pot Lasagna Recipe and More
This post contains Affiliate links. As an Amazon Associate I earn from qualifying purchases.
Pin This Recipe


All the work of regular lasagna and none of the leftovers. Personally I think it’s WAY too much parmesan for such a tiny amount of lasagna. It overwhelmed the dish.
Some people don’t want a huge pan of it, or leftovers. It’s only 1/2 cup of parm, but it could be that you are sensitive to that flavor. I appreciate the feedback, and that you took the time to leave a comment.
This was an easy, flavorful recipe that became a favorite when our kitchen was being remodeled and I was cooking out of a Instapot in my laundry room. I still make it, even though I have my kitchen back. Thank you for a tasty and creative way to use the Instapot!
Hello…I’m so excited to make this for my brood! I’m just wondering if it were possible to prepare the lasagne as instructed and place the prepared covered pan in the refrigerator overnight to then finish cooking in the IP the following day?
Thank You!
Regards
Yes, you may need a minute or 2 longer cook time as the contents will be cold.
It came out perfectly! I tried another recipe once and it failed due to not having a solid filling – my sauce was too thin and I relied on meat sauce to provide the meat. If I could share my picture, you’d see that it came out of the springform pan just like yours. I did notice a little bit of leaking from the pan, but I was told that’s normal as that seal isn’t 100% liquid-proof. I wish they made oven ready lasagna noodle rounds – hopefully someone will!
This is my favorite lasagna recipe to go to. Making it right now. Love your recipes.
I wanted to make this right now but you don’t have instructions for no spring pan or anything else. Not everyone has everything that you have. I just have the pot..
Try my Lasagna Soup, it’s the only way to make it in the main pot.
I absolutely love your recipes. Your recipes are so tantalizing and I found it quite easy to use heathlier pastas, etc. Could you just mention the possibility of healthier alternatives for us foodies who have learned to alter their recipes accordingly? Thank you.
I plan on making this tomorrow. I can’t wait! I am a little confused about the instructions about regular lasagna noodles. In the post it suggests “he results were best when I soaked them first in very hot water for 15 minutes.” However, in the directions, it only recommends 5 minutes. Can you please clarify if regular lasagna noodles should be soaked for 15 or 5 minutes?
Sorry, I guess it is a typo. 15 minutes. I’ll go fix that!
Sandy, You nailed this recipe! I did have to use Alfredo sauce instead of tomato sauce bc my hubby doesn’t care for tomato sauce.
Soaked regular lasagna noodles longer while I ran out to get the cheeses. 😇
It’s PERFECT!!
OMG…that sounds so good. I have difficulty eating tomato based sauces, so this will be perfect! White lasagna! Thanks!!!