
This post may contain affiliate links. Please read our disclosure policy.
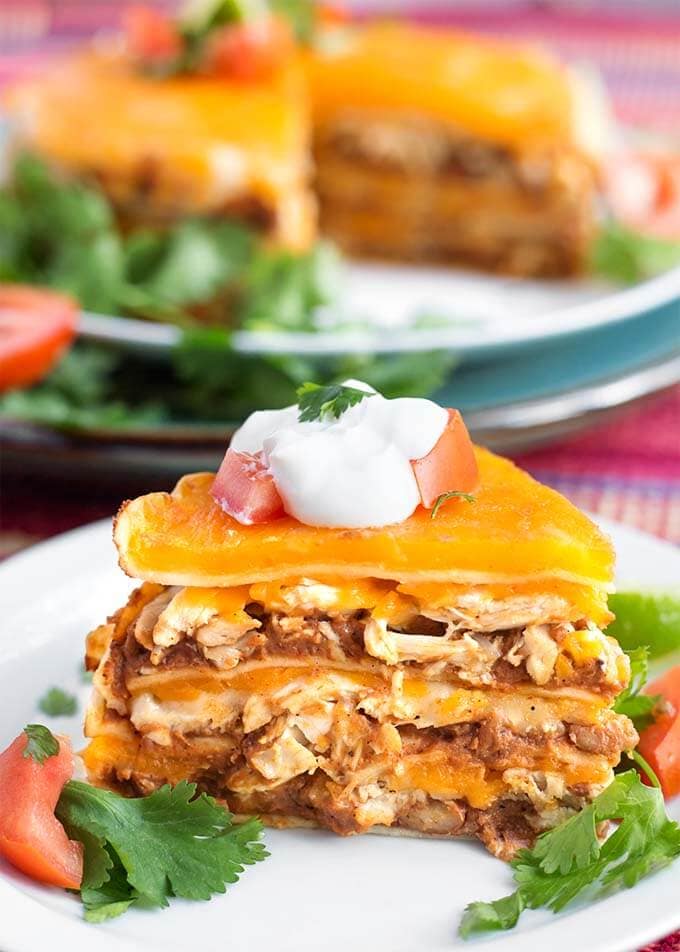
Instant Pot Chicken Taco Pie is a fun dish to make, and uses ingredients most of us have already. I like to make this pressure cooker Chicken Taco Pie using a rotisserie chicken, or leftover cooked chicken meat. It’s tasty and my family loves it!
Originally published 4/13/2018
Instant Pot Chicken Taco Pie
Layered casserole recipes are awesome. I have several that I have made in my trusty 13″x9″ baking dish for years. Did you know you can make a layered taco pie in the pressure cooker?
Instant Pot Chicken Taco Pie cooks beautifully in the pressure cooker, and is cooked using the PIP (Pot in Pot) method.
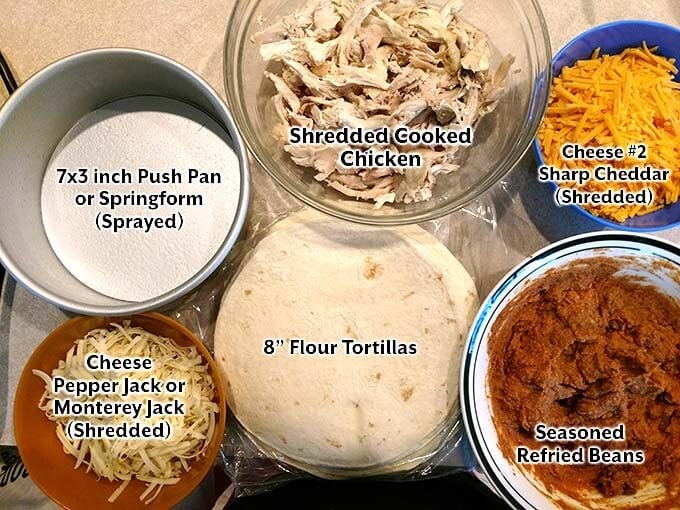
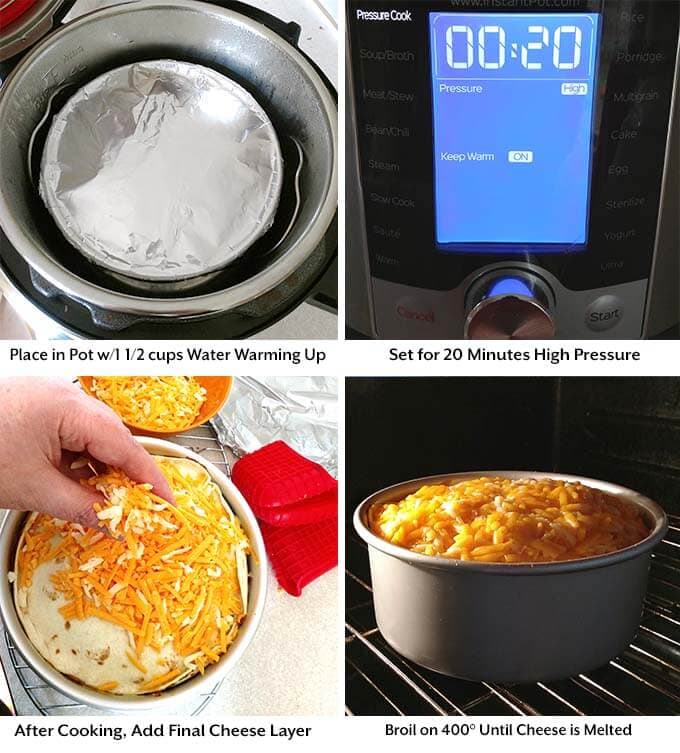
Here is a quick rundown of what you’ll need to make Instant Pot Chicken Taco Pie: 7″x3″ pan, 8″ flour tortillas, shredded chicken, shredded cheese, seasoned refried beans.
What is the Pot-In-Pot Method?
Pot-In-Pot Cooking, also called PIP, is a method of cooking food that you don’t want watered down (such as a quiche, lasagna or cheesecake). Or for foods that are too thick (not enough thin liquid) to build pressure.
The pressure cooker needs thin liquid, such as water or broth, to make steam that builds up and creates the pressure needed to pressure cook the food.
Soups do well, but a pot of bread pudding will absorb the liquid and there won’t be any left to build steam and pressure. Then you will get the dreaded “BURN” message. Nobody wants that!
So you put the food in a separate cooking dish (preferably stainless, or an oven safe pan) and set it on the trivet/rack within the inner liner, where it is suspended above the water.
The water goes directly into the inner pot, then the trivet/rack is set in the pot, then the pan of food sits on the trivet (never directly on the bottom of the inner liner).
So literally it is a pot/pan in a pot.
Resume pressure cooking as normal. The PIP method usually requires a longer cook time than if the food was cooked directly in the inner liner.
Here’s the step-by-step for those who like the visual:
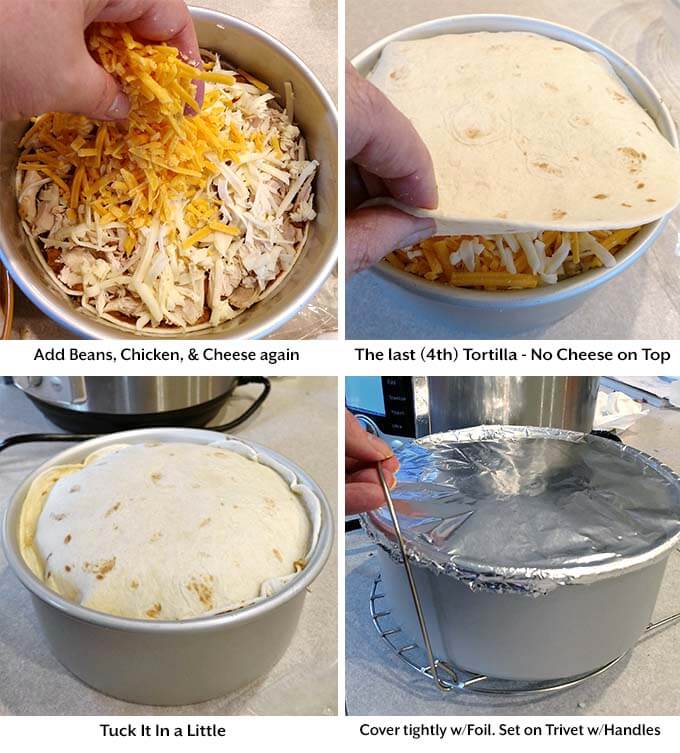
There will be 3 layers of beans/chicken/cheese, and 4 total tortillas to complete your Instant Pot Chicken Taco Pie.
If you are using a push pan, this is how you get the taco pie out of it. A spring form pan will just need the buckle undone.
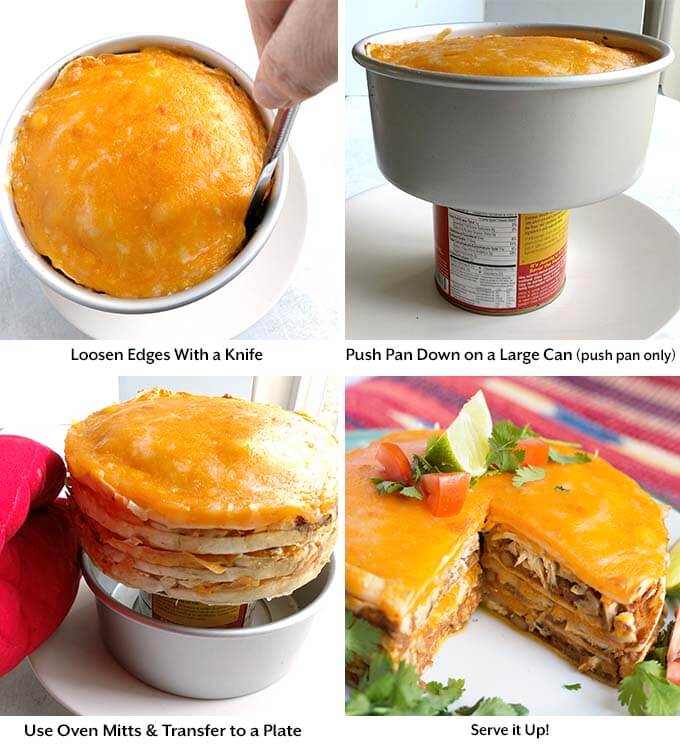
It helps to let the taco pie rest a few minutes after you broil the cheese on top. This helps the taco pie set up a bit so it doesn’t collapse when you release it from the pan.

Instant Pot Taco Pie (Beef)
Instant Pot Chicken Taco Bowls
Instant Pot Quinoa Taco Bowls
Instant Pot Mexican Rice
Pin this pressure cooker Chicken Taco Pie recipe

If you make this easy and delicious taco pie recipe, please leave a comment and a star rating below. I’d like to know how you liked it!

Instant Pot Chicken Taco Pie
Ingredients
- 1 ½ cups Water (for the pressure cooker)
- 1 small whole Rotisserie Chicken, (or other cooked chicken) deboned, skinless & shredded (about 3 cups of meat or so)
- 1 can Refried Beans
- ¼ cup Salsa
- 2 Tbsp Diced Green Chiles
- 1 Tbsp Taco Seaoning
- 1-2 cups Pepper Jack Cheese, shredded (or Monterey Jack) plus extra for the top layer
- 1-2 cups Cheddar Cheese, shredded (plus extra for the top layer)
- (4) 8 inch Flour Tortillas (if using 7 inch pan)
Garnishes (choose your favorite)
- Sour Cream
- Salsa
- Cilantro
- Avocado
- Hot Sauce
Tools You Will Need
- 6 qt or 8 qt pressure cooker (if using 8 qt, increase the water to 2 cups)
- The trivet with handles that came with the pot
- 7x3 inch Push Pan or Springform Pan (2.5 inch is okay, but it will make a smaller amount)
- Cooking Spray
- Aluminum Foil
Instructions
- Gather and prepare everything you will need. Prepare the rotisserie chicken, or other cooked chicken, shred the cheese, spray the pan with cooking spray.etc.
- Add the water to the pressure cooker's removable inner pot/liner.
- Set the pot to the Sauté setting. This will start the water heating up, which will bring the pot to pressure faster.
- In a small bowl, mix the can of refried beans with the salsa, green chiles, and *taco seasoning.
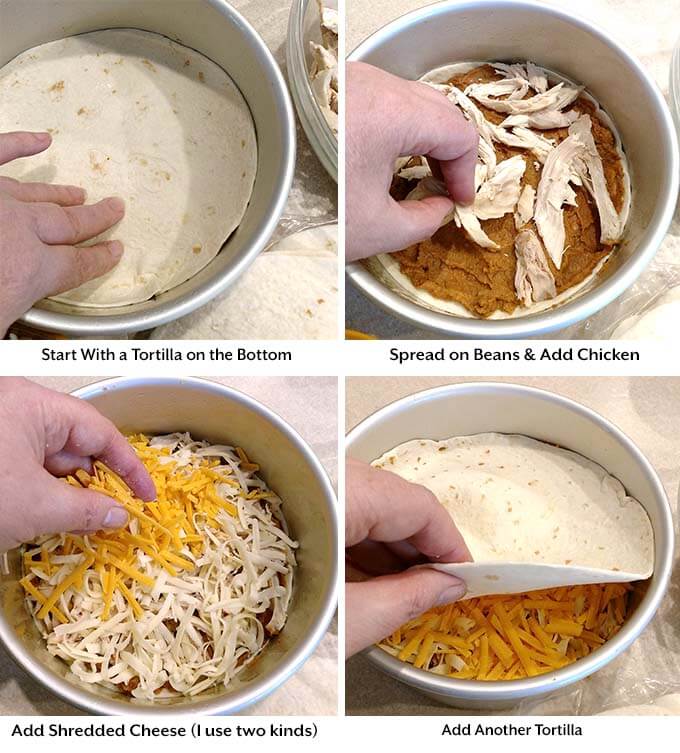
- Place a tortilla in the pan and press it down (it will be slightly bigger than the pan, and that's okay).
- Spread on 1/3 of the bean mixture, then 1/3 of the shredded chicken, and 1/3 of the cheese.
- Place another tortilla in the pan and press it down. Spread on 1/3 of the bean mixture, then 1/3 of the shredded chicken, and 1/3 of the cheese.
- Place a third tortilla in the pan and press it down. Spread on 1/3 of the bean mixture, then 1/3 of the shredded chicken, and 1/3 of the cheese.
- Place a fourth tortilla in the pan and press it down. Nothing goes on top of this layer yet.
- Wrap a piece of foil over the top and crimp it around the edges (you don't want the inside to get wet).
- Set the pan on the trivet and use the handles to carefully lower it into the pot.
- Cancel the Sauté setting. Place the lid on the pot and set the knob to the sealing position.
- Press the Pressure Cook/Manual button, or dial, and then the + or - button or dial to select 20 minutes.
- When the cook cycle ends, do a Quick Release of the pressure and when the pin in the lid drops down, open the lid and use silicone mitts to very carefully remove the trivet/pan.
- Carefully remove the foil and sprinkle on the remaining cheese.
- Turn on the broiler to 400° and set the pan under it and broil until the cheese melts.
- Let sit for just a few minutes to cool a bit and set up. Then remove from the pan and serve.
- Garnish with sour cream, avocado, salsa, cilantro, hot sauce, or whatever you like and serve!
Notes
Nutrition
Nutrition information is automatically calculated, so should only be used as an approximation.

Resources to Make This Recipe and More
We are a participant in the Amazon Services LLC Associates Program, an affiliate advertising program designed to provide a means for us to earn fees by linking to Amazon.com and affiliated sites.


Not a huge refried beans fan, is there anything else I could use instead? Thank you
Maybe mash up some black beans with a little cumin?
Hi…looking for some different things to make…this sounds good…but I don’t have any accessories…time to do Amazon..but, my question is…why don’t you have a place to save recipes???? I’m afraid I’ll see some good ones and by the time I get the push up pan, I won’t find the recipe again.
Hi Phyllis. I don’t know what I would use. I’ll look into it.
I am celiac and cant have flour tortillas. Do you think corn tortillas would work? Any change to the time or method?
Yes, they break up a little, but have great flavor.
I will definitely be trying this. Love your recipes. Now that the CrispLid is available, I think that can be used instead of the broiler, don’t you?
Yes! The crisp lids are a game changer!
Made this for lunch for my friend and I…its absolutely delicious. It was my 1st time using a push pan, and its easy as pie! Served the left overs to my office, and everyone loved it. This recipe is defo a keeper.
I was so tired after work tonight and needed to find something quick. I had some Purdue precooked grilled chicken breasts…the kind in the 8 oz bags that are sliced up and I wanted to use them before the expiration date (1 being today). I had the other ingredients so this looked easiest and fastest. Score!
The husband is picky and he’s on his second helping as I type this. Our 2 young adult boys are giving this a total thumbs up (and one is as picky as his dad). I liked that it was less saucy than similar recipes using ground beef and despite the cheese, it wasn’t greasy. I used vegetarian re-fried beans. I don’t know if I missed it…but I didn’t see anything about the chilis so I added them in the beans.
This was good without the extra toppings but I did slice up avocado and it was great.
Thank you for posting the recipe.
Hi Dawn! I’m happy that your family enjoyed this recipe! Thank you for your review!
I was so excited that I had everything to make this! My son and husband thought I was crazy when I was making this! Then when they were eating it they both were shaking their heads up and down saying mmmmm. Mom knows best! Thanks for a great recipe, this one’s a keeper!
Hi Kathleen! Wow, that was fast, I just posted this recipe today! Great timing! Well, I’d have to agree that mom knows best. I’m so glad you liked this recipe. Thank you for your review, I enjoy reading them, and they help others know if a recipe worked for someone else.