
This post may contain affiliate links. Please read our disclosure policy.
Instant Pot Chili Mac is a great one-pot meal that is filling and tasty. With the option of Cheesy Chili Mac, it will feed the whole family! This pressure cooker chili mac is made with easy to find ingredients and is delicious!

Instant Pot Chili Mac
Today was super busy. I decided to make a video showing how to make my Instant Pot Pumpkin Cheesecake. There is a bit or preparation, as several of the ingredients need to be at room temperature. So I was all ready to push the record button when the next door neighbors started up a JACKHAMMER!
It was so funny because every time I thought they were finished, and I started talking, the jackhammer would start up again! And that thing was loud! Our houses are very close together, so it sounded like it was in our back yard!
I just laughed, and was happy that no one was here to see that! Our neighbors are wonderful, and they are having their yard re-landscaped, so there will be noise! No big deal!
With the day being so busy, we are going to have this Instant Pot Chili Mac for dinner tonight. So easy. I opted for the cheesy version. Yum!
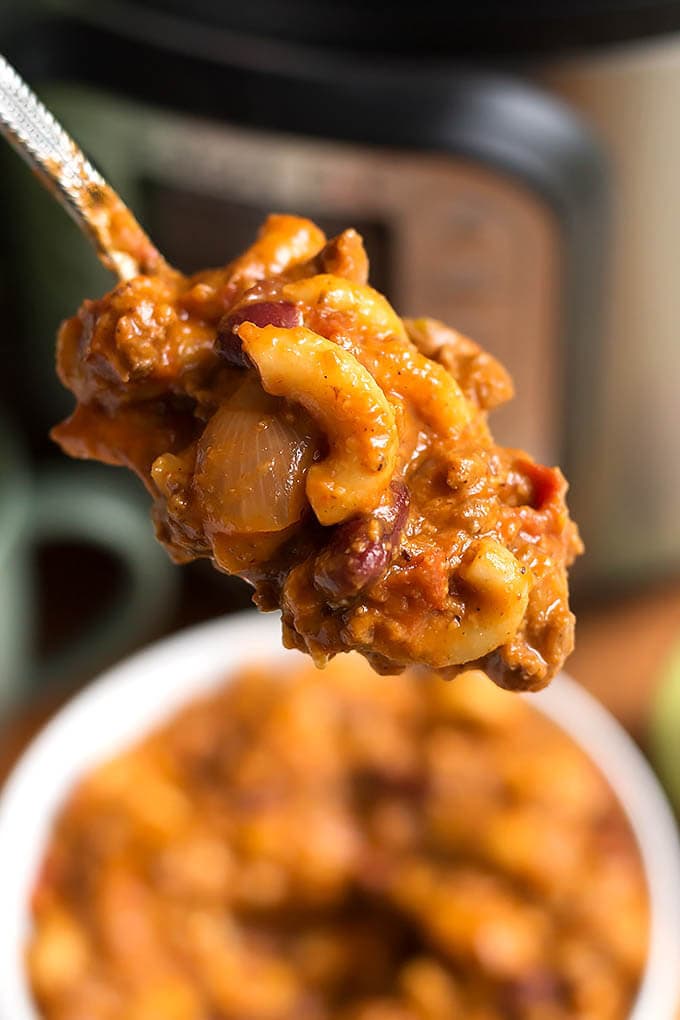
This is the Cheesy version.
If you want to watch my Instant Pot Pumpkin Cheesecake video, it is posted here: Instant Pot Pumpkin Cheesecake Video

Instant Pot Taco Soup
Instant Pot Chicken and Noodles
Instant Pot Pumpkin Chili
Instant Pot Cheeseburger Macaroni
Instant Pot Taco Pasta


Instant Pot Chili Mac
Ingredients
- 1 lb 93% Lean Ground Beef or Ground Turkey (you won't need to drain as very little fat)
- 1 Onion, chopped
- 1 Bay Leaf
- ½ cup Celery, chopped
- 1 Tablespoon Chili Powder, mild
- 1 Tablespoons Cumin
- 2 teaspoons Oregano, dried
- ½ teaspoon Cinnamon
- ¼ teaspoon Chipotle Powder (optional, or cayenne pepper)
- 1 ½ teaspoons Kosher Salt (or 1 tsp table salt)
- ½ teaspoon Black Pepper
- 4 cloves Garlic, minced
- 2 ½ cups Beef or Chicken Broth
- 1 (4 oz) can Green Chiles (mild, fire roasted are good)
- 2 (15.5 oz) cans Red Kidney Beans (rinsed & drained)
- 8 oz Elbow Pasta (macaroni)
- ½ (15 oz) jar Roasted Red Bell Peppers, drained & chopped
- 1 (14.5 oz) can Diced Tomatoes (juice and all)
- 1 (15 oz) can Tomato Sauce
Optional - To Make Cheesy Chili Mac
- 2 ½ cups Sharp Cheddar Cheese, shredded
Instructions
- Press the Sauté button on the Instant Pot. Add the ground beef and cook, stirring occasionally, until almost done.
- Add onion, bay leaf, and celery. Sauté until almost translucent, stirring occasionally. Make sure to scrape up any brown bits on the bottom of the pot (deglaze).
- Add garlic and the spices. Stir.
- Add in the broth, chiles, and beans Stir to combine. Let the contents come to a simmer.
- Add the pasta, do not stir, just gently press and submerge it a little.
- Press the Cancel/Keep Warm button to cancel the sauté mode.
- Add the red peppers, tomatoes and tomato sauce, and let them stay on top. DO NOT STIR (this helps alleviate the potential burning that can happen with tomatoes).
To Pressure Cook
- Put the lid on the pot and set the steam release knob to “Sealing” position.
- Press the Manual (or Pressure Cook) button and the + or - button to select 4 minutes* (or half of the time on the pasta package directions), and make sure that High Pressure is selected.
- When cooking time ends and the unit beeps, do a Controlled Quick Release (QR) (slowly at first, in small bursts so sauce doesn't spew out of the knob) of the steam.
- When the steam is all out and the pin in the lid drops, carefully open the lid, facing away from your face. Stir contents.
- Add cheese, if using, and stir. Let sit a minute until melted.
- Season with more salt & pepper to taste, if desired.
- Garnish as desired. Serve it right away!
Notes
Nutrition
Nutrition information is automatically calculated, so should only be used as an approximation.


This too looks amazing! We don’t eat meat, so I would use meat alternative (Mexican flavor) Smart Ground by Lite Life. Since it’s ready to eat, would you still recommend sautéing with onion, or adding after onion is translucent?
Have you used any meat alternatives? Would love to see instant pot recipes using them. 🙂
Thank you!
I would cook the onion first, then add in the Smart Ground and proceed.
We are vegetarian also. I hear the veggie grounds on the stove with a little olive oil. This way it doesn’t get super mushy
I’ve made this several times and felt I should finally leave a “thank you” comment!
Hubby, kids and grandkids love it!
That’s really nice, Kim! And thank YOU, too!
Does this all fit in a 6qt IP? I’d love to try it,
Yes, I use a 6 qt for this recipe!
This was the best chili mac that I have ever made. Totally loved it. Will add it to my board of meals to make again!! THANK YOU!!!
Awesome! Thank you for letting me know, and for your review!
LOVED this recipe and it made so much! I will have lunch for a week! I added a fresh seeded jalapeno instead of the canned chilies, beef broth and also used tomato paste instead of tomato sauce. Super easy and fast. Thank you for sharing!
Hi Kristina, I’m so glad you liked this chili mac recipe! Thank you for your review!
Very good recipe. Made for wife and I. We knew we would have left overs and adding cheese mixed in would have made it like a brick after refrigerating. We just sprinkled graded cheese on top of our servings which worked great. Thanks for sharing!
Hi Mike, I’m glad you and your wife enjoyed this! Adding the cheese later was a great work around. Thanks for the review!
This was outstanding! I used the cayenne pepper for more spice and only because I didn’t have any beans they were omitted. I will be making this again! I also doubled it in my 8 quart PC.
Hi Jeanette! Thank you for the great review! I’m happy that you liked this Chili Mac!
This is delicious! I did use a can of chili beans but didn’t change anything other than that.
Hi Cathy! I’m glad you liked it! Thank you for taking the time to leave a comment!
Can’t wait to try this. I usually make a chili mac that I dehydrate and take on hiking trips, but for my next trip I’ll try yours…it looks delicious!
Hi Jaxx, that sounds amazing, to dehydrate the Chili Mac! I’ve only dehydrated fruits and such. I hope you like my version! Thank you for the comment!
How do you dehydrate it? I would love to do this. Thank you.
We dehydrate chili all the time for backpacking. It’s easy to do “regular” meals in a dehydrator, just make it a “thick” version of the food then use the fruit leather trays for the dehydrating. Smooth out the food using a spatula and turn on the dehydrator. Warning: It’ll take quite a bit of time (you know it’s done when you squeeze/bend the resulting leather/chunks in the middle and no moisture comes out) and it *smells* like dinner cooking the entire time! Keep track of the serving size you put on the tray so you’ll know how many servings you have. If you’re using it pretty soon, simple storage in ZipLoc bags works fine and packs easily in a backpack. I’m not thinking the “cheesy” version of this recipe would be so good for dehydrating due to the high cheese/dairy content (too greasy). I have done beef stroganoff, though, but the sour cream content means that it doesn’t “keep” as long in the cupboard before we head out on a hike.
Hi Tonya! Great tips, thank you. This is really interesting! Waaaay back in the day my dad gave us a dehydrator for a wedding gift. May have to try this!
Our family loved the recipe and it made plenty of leftovers! I know if I still had kids at home they’d love it too!
I’m so glad you and your family liked it! Thank you for your nice comment, Linda!