This post may contain affiliate links. Please read our disclosure policy.
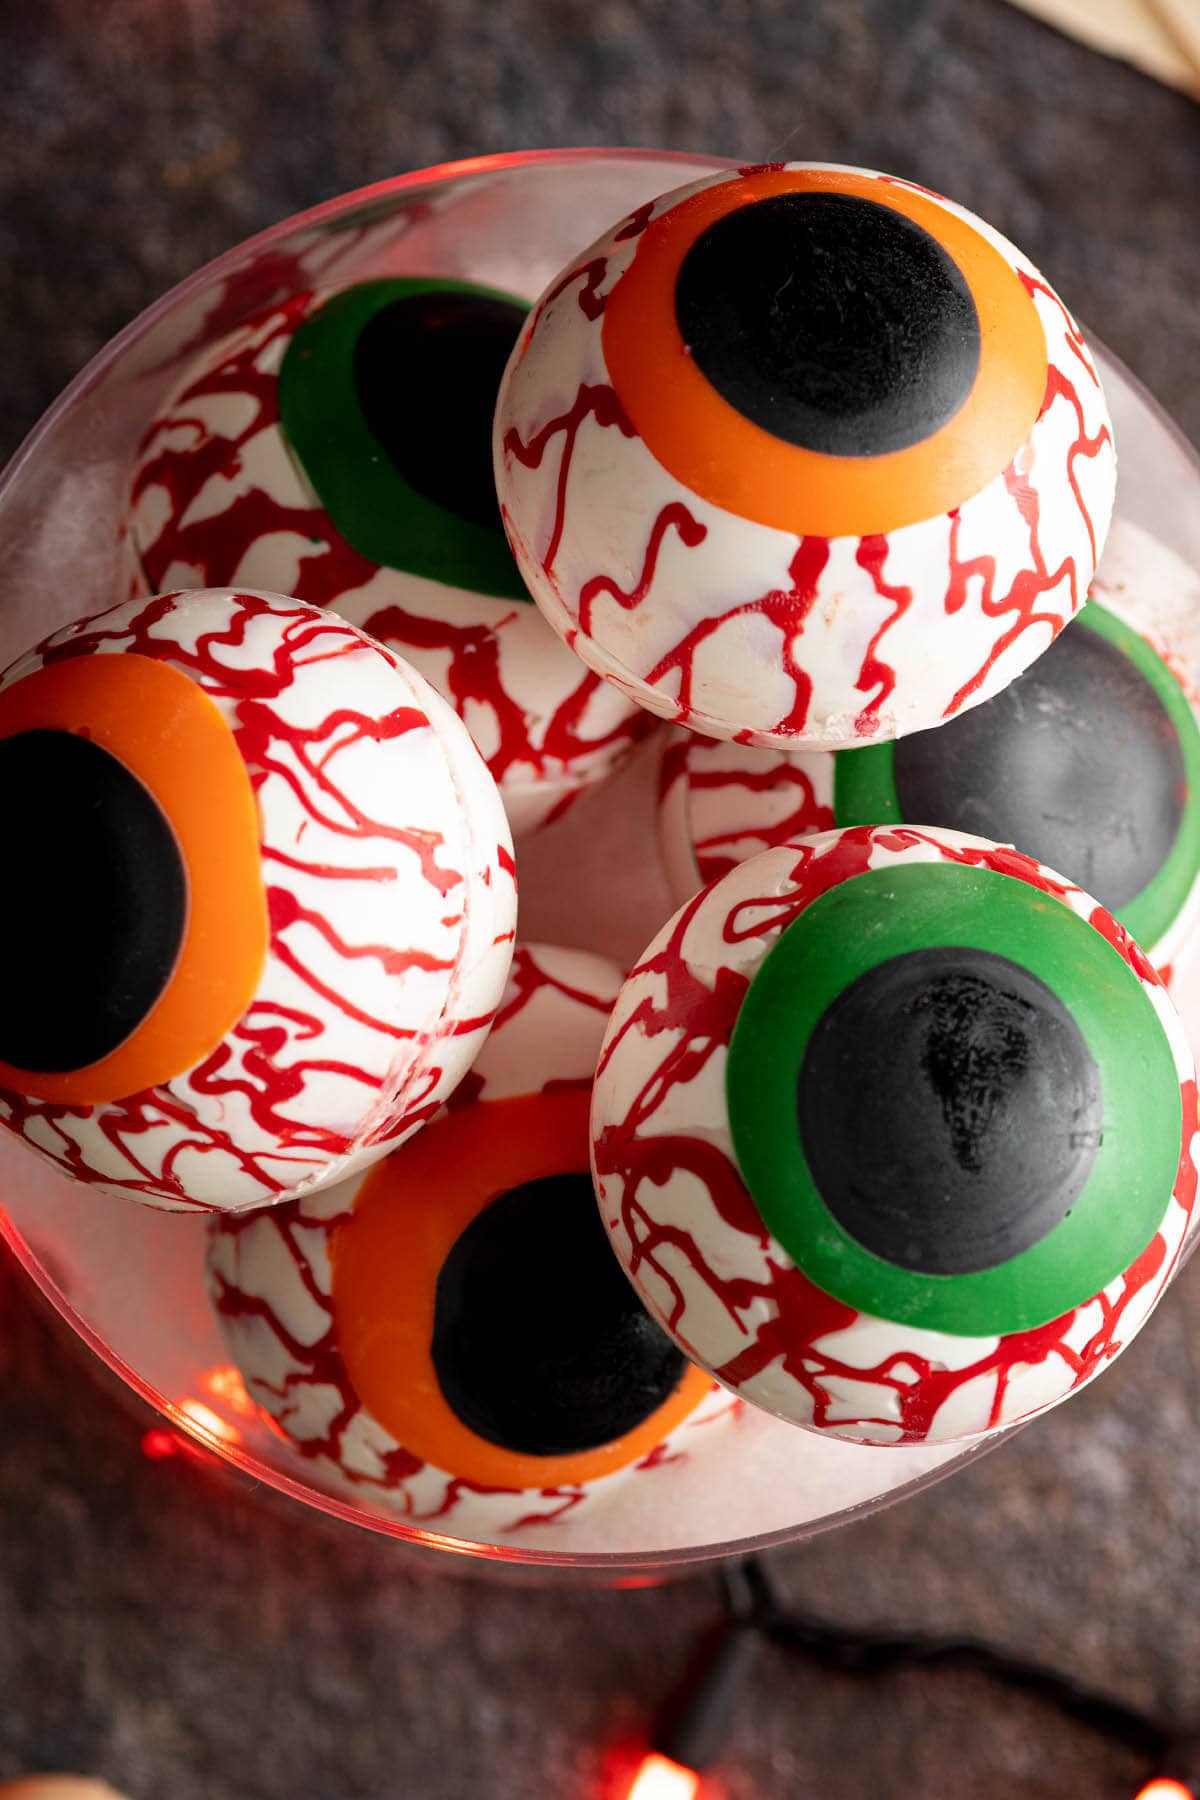
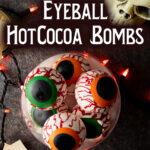
Halloween Eyeball Hot Cocoa Bombs are a fun and tasty hot cocoa bomb recipe. The special eyeball decoration make these cocoa bombs spooky enough for Halloween parties, or just for fun!
These are step-by-step instructions on how to make hot cocoa bombs.
Halloween Eyeball Hot Cocoa Bombs
Whether you are having a Halloween party or are just returning from an exhausting evening of Trick-or-Treating, Hot Cocoa is a perfect Halloween treat to come home to.
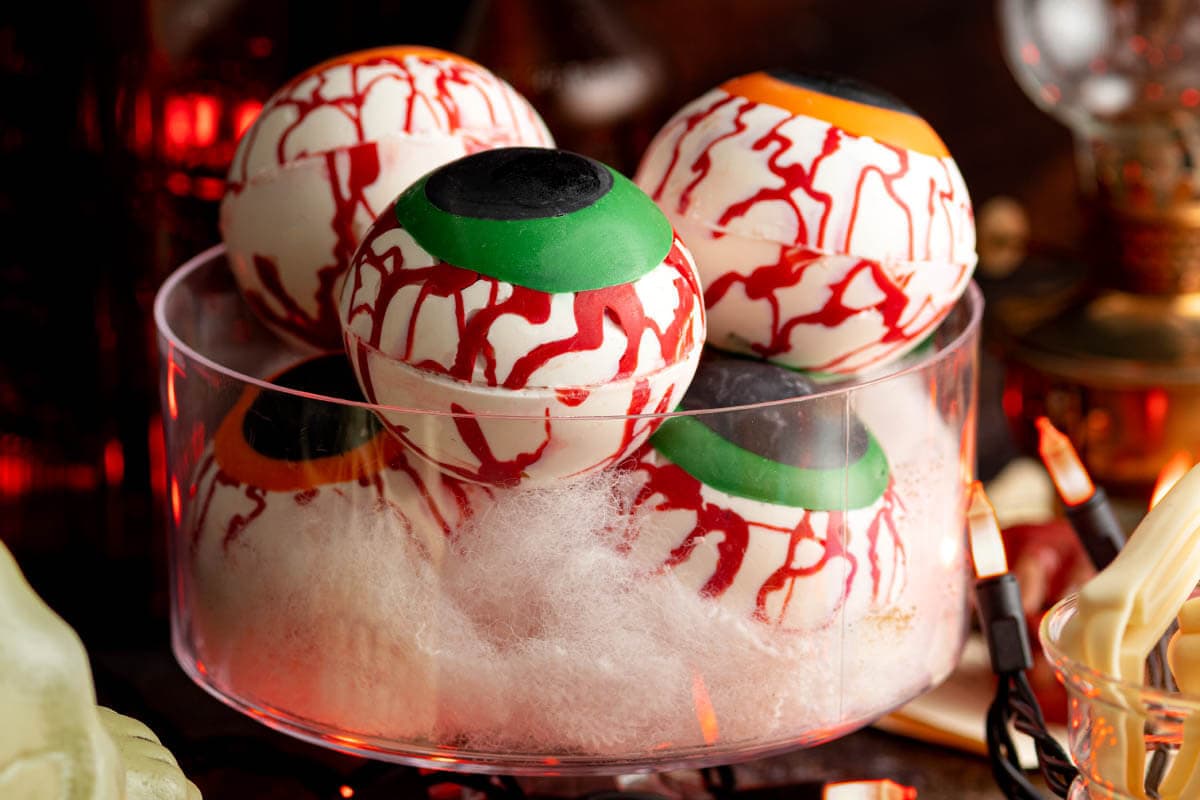
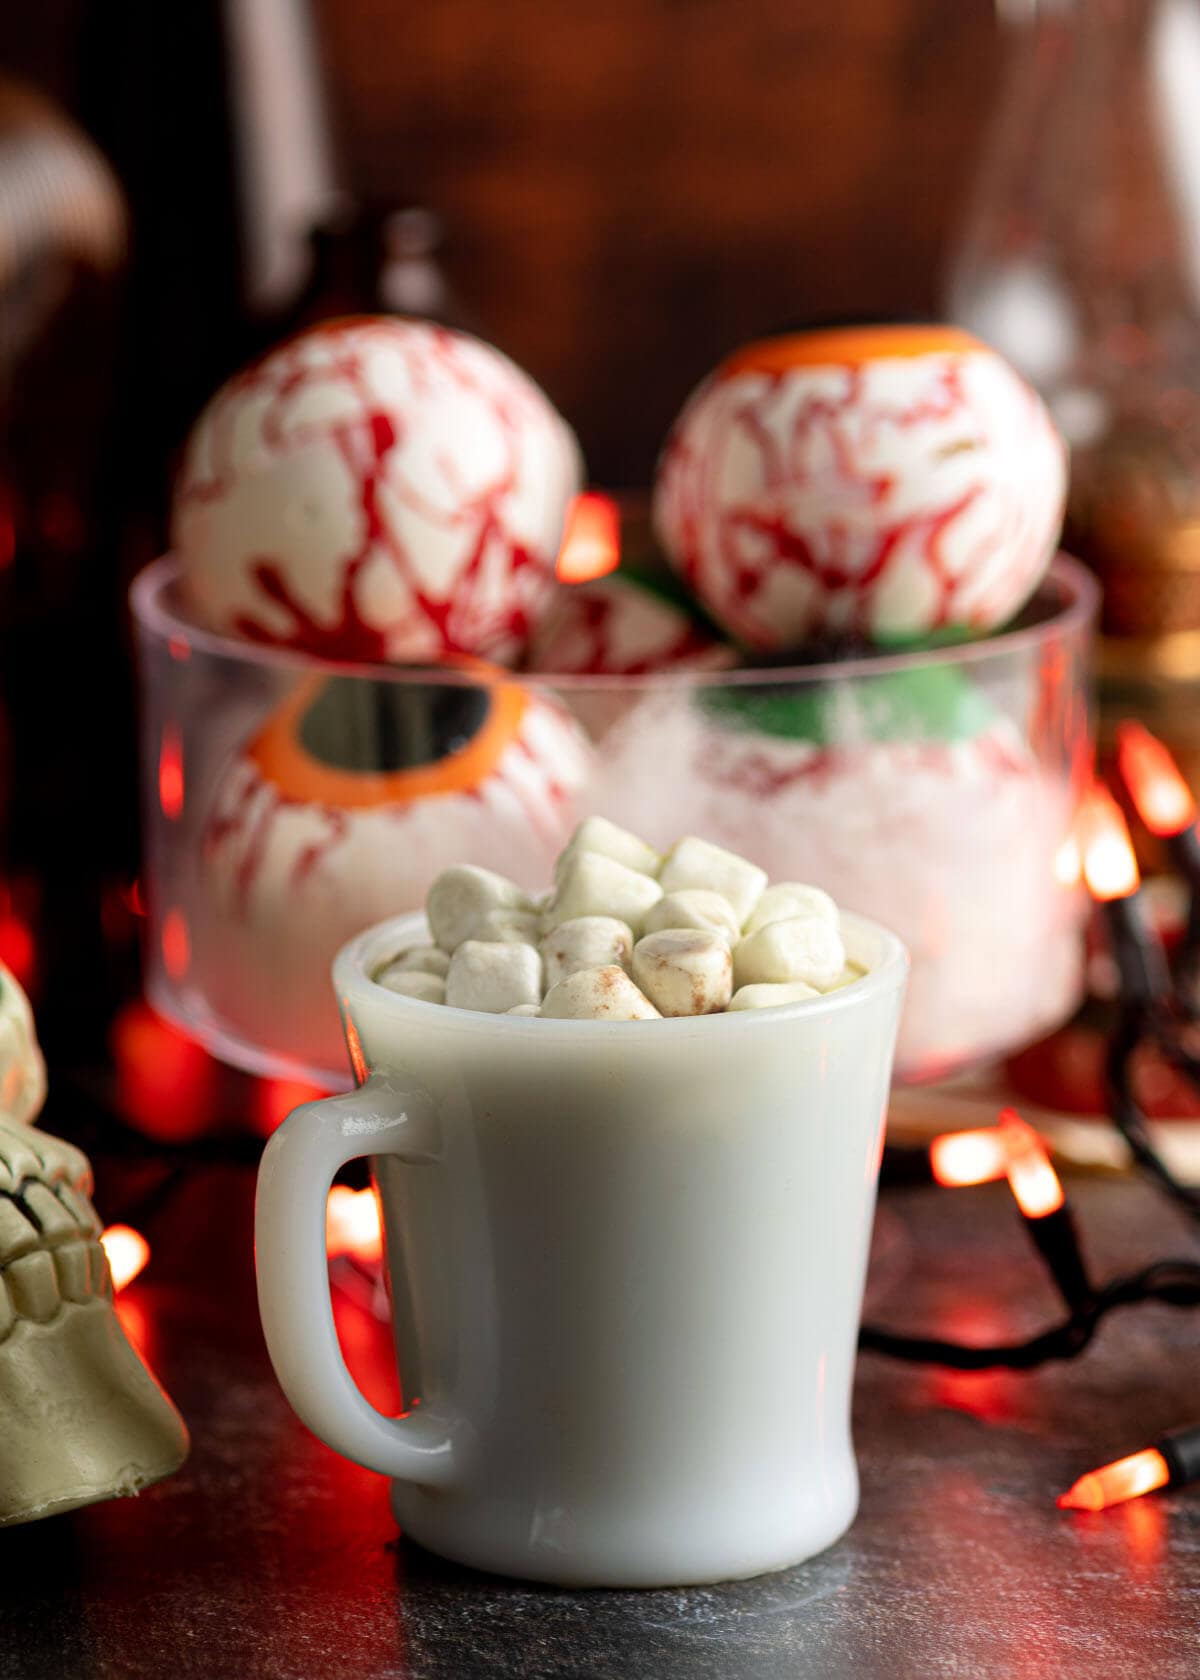
Halloween Eyeball Hot Cocoa Bombs make a cool spooky decoration for your Halloween Party table.
What is a Hot Cocoa Bomb?
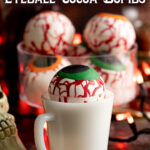
A candy melt shell melts away under hot milk, releasing delicious hot cocoa mix and mini marshmallows. Once stirred and emulsified, a smooth, rich, spooky drink comes together.
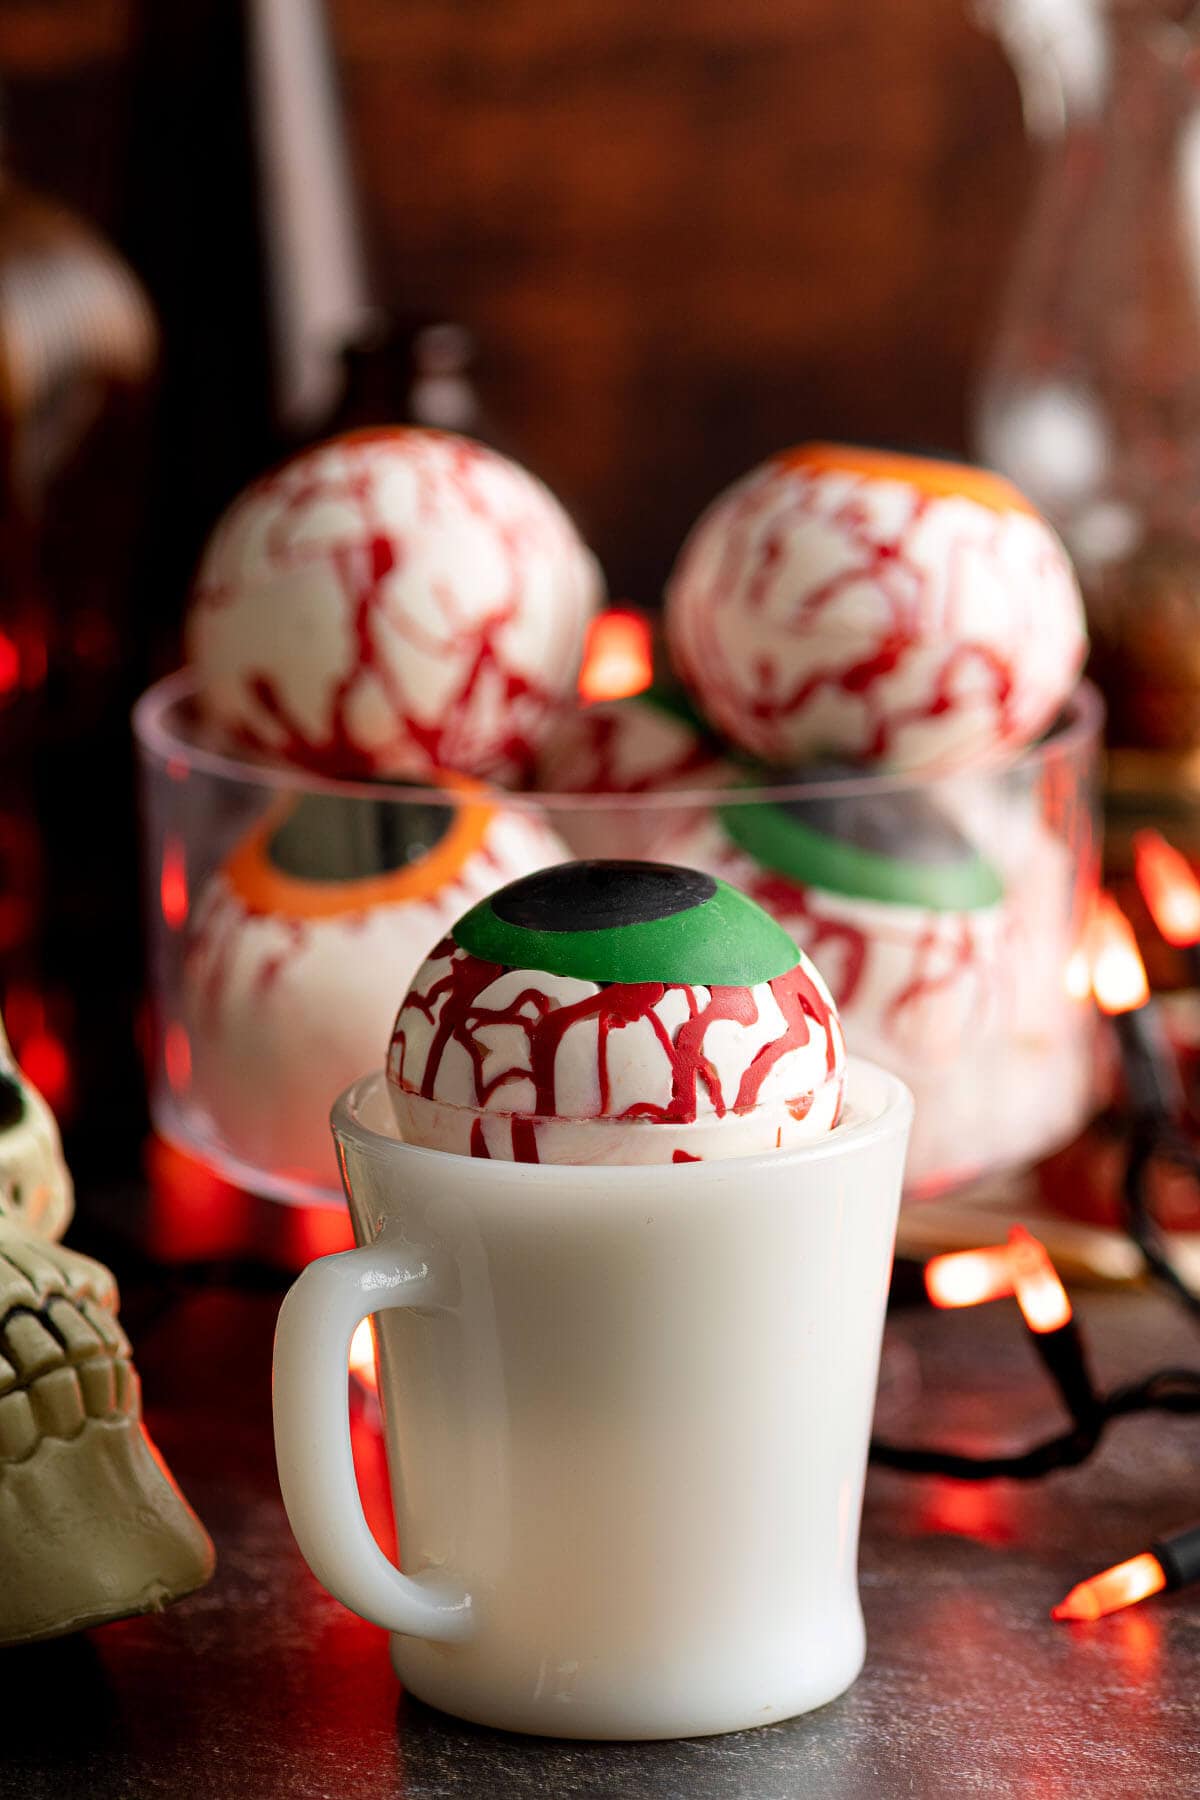
All you need to do is pour some hot milk over the cocoa bomb and let it melt before stirring (Young children may need supervision with this so they don’t get burned).
Where Do I Find the Cocoa Bomb Molds?
This post contains Affiliate links. As an Amazon Associate I earn from qualifying purchases.
Below I have listed some Amazon links to get the mold, candy melts, and some good oil-based food dye (if needed).
Hot Cocoa Bomb Mold
Melting Chocolate
Oil Based Food Coloring for Chocolate
Step-by-Step Cocoa Bombs Tutorial
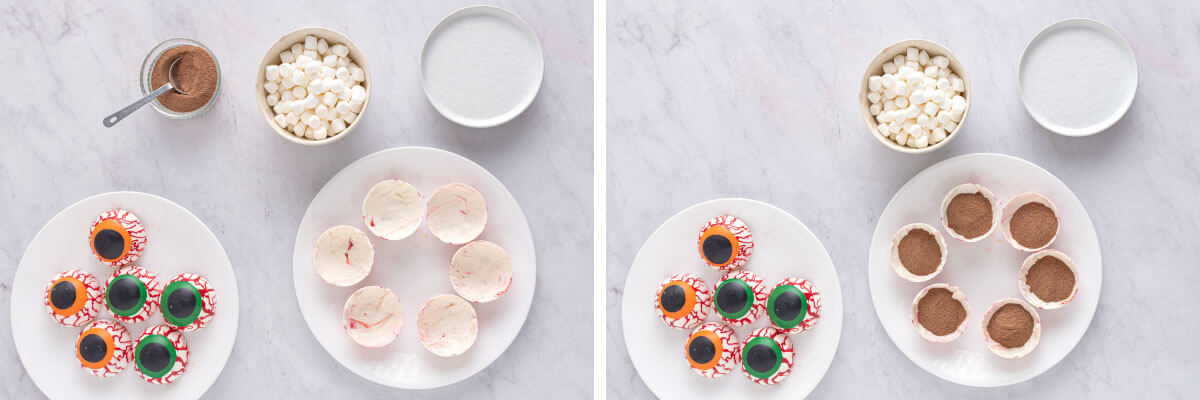
With the two halves ready, you can begin filling the cocoa bombs. Add 1 Tablespoon of the cocoa into the bottom half of the eyeball.
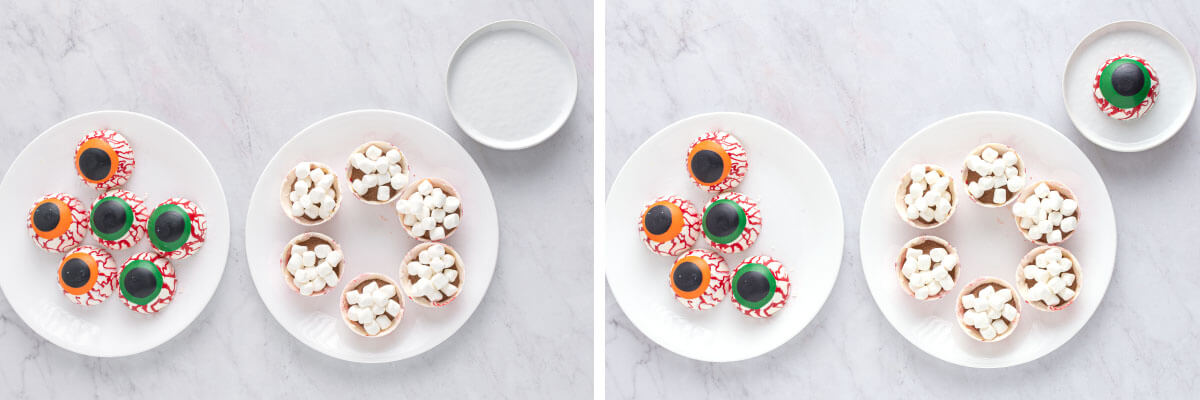
Next, add a few of the mini marshmallows on top of the cocoa. Then warm up a small plate and set a top half of the eyeball on it to melt the rim.
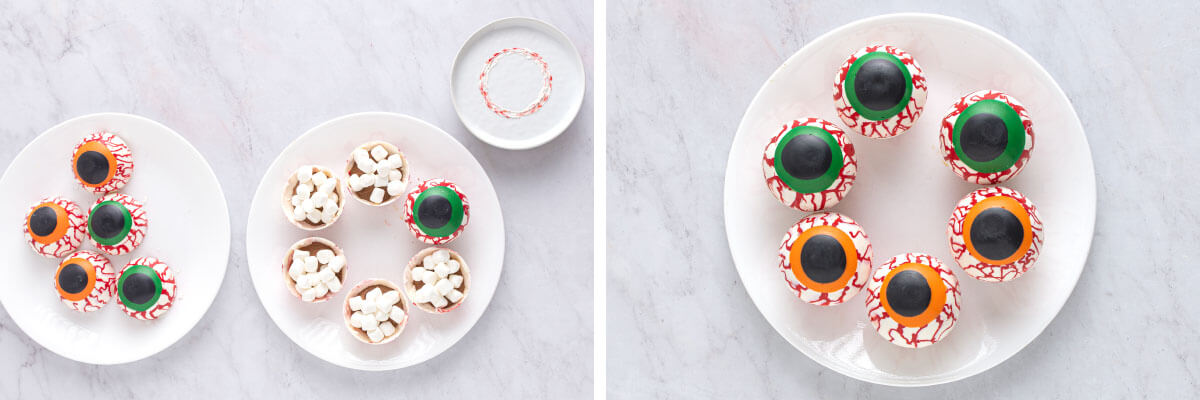
Set the top half of the eyeball on top of the bottom half and smooth it with your finger. Repeat this with all of them.
Tips:
- When warming up the candy melts, the white ones will occasionally burn on the bottom. Be sure that you do not warm them for more than 30 seconds at a time to avoid burning them. Make sure you mix well each time. If the candy melts do burn, discard them and start over. Be sure to wash and dry the bowl well before starting over so as to avoid any previously burnt flavor.
- If you warm them for 30 seconds and find they are still burning, reduce the time to 15 seconds and stir after each interval.
- Don’t add more than the recommended amount of candy melt to each mold as it will create too thick of a bomb shell and you will not be able to fill it with many fillings.
- If you are unable to “glue” both halves together, you may have too many marshmallows in the middle. Simply remove a couple marshmallows and try again.
If you make these fun Halloween Hot Cocoa Bombs, please let me know!
Just leave a comment with a star rating in the comments section below. I’d love to know how you liked these!

White Chocolate Halloween Ghosts
Halloween Witch Hat Cupcakes
Halloween Hot Dog Mummies
Dark Chocolate Halloween Cookies
Halloween Jello Brain Recipe
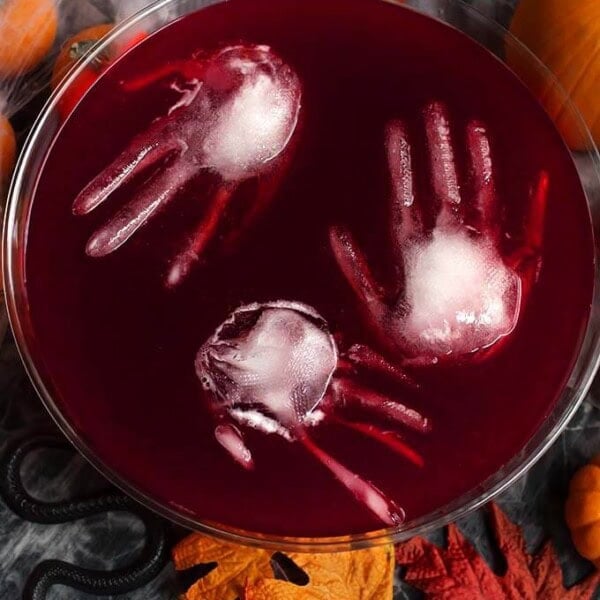
Spooky Halloween Party Punch

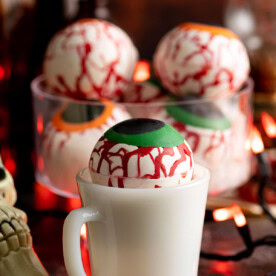
Halloween Eyeball Cocoa Bombs
Equipment
- Coco Bomb Molds
- Food Coloring
- Zipper Style Storage Baggies
Ingredients
- ¼ cup Black Chocolate Candy Melts
- ¼ cup Green Chocolate Candy Melts
- ¼ cup Orange Chocolate Candy Melts
- ¼ cup Red Chocolate Candy Melts
- 1 cup White Chocolate Candy Melts
- 6 Tablespoons Milk Chocolate Hot Cocoa Mix
- ½ cup Mini Marshmallows
See Notes About Food Dye for Chocolate (if needed)*
Instructions
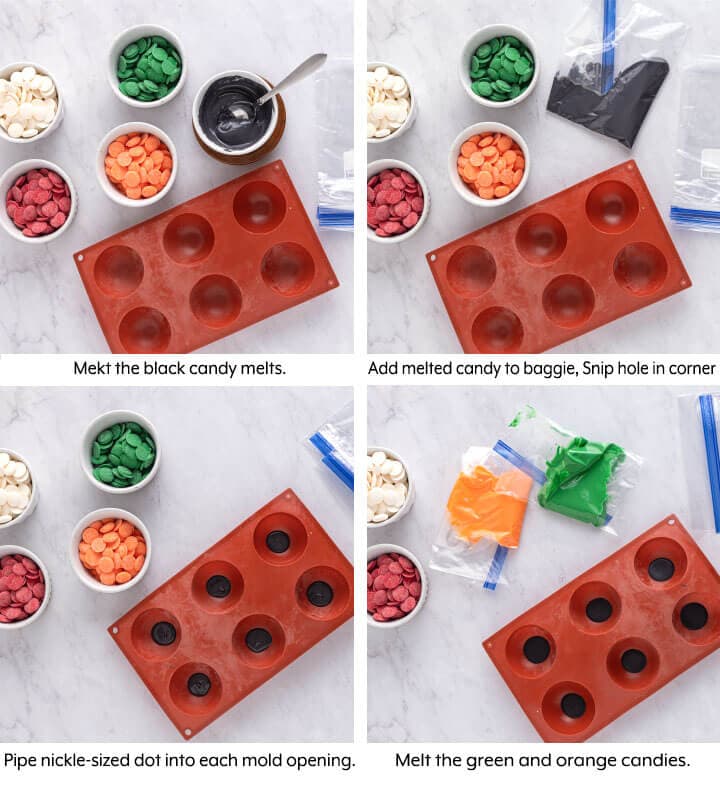
- In a small bowl, warm the black candy melts in the microwave in 30 second intervals, stirring each time. This should take 30-60 seconds. Once completely melted and smooth, spoon into a baggie or piping bag. Snip a corner to make a nickel sized hole. Pipe a quarter sized circle into the center of 6 half sphere, silicone mold openings. Place into the freezer to quickset for 5 minutes.
- Warm the green and orange candy melts in two separate bowls in 30 second intervals, stirring each time. This should take 30-60 seconds. Spoon the melts into two separate baggies. Snip a corner to make a nickel sized hole. Pipe a 1” round circle on top of the black candy melt. You want the orange or green circle to be large enough to create an iris but you do not want it so big that it seems out of proportion to the rest of the eye. Once all of the eyes have orange or green, place back into the freezer to quickset for 5 minutes.
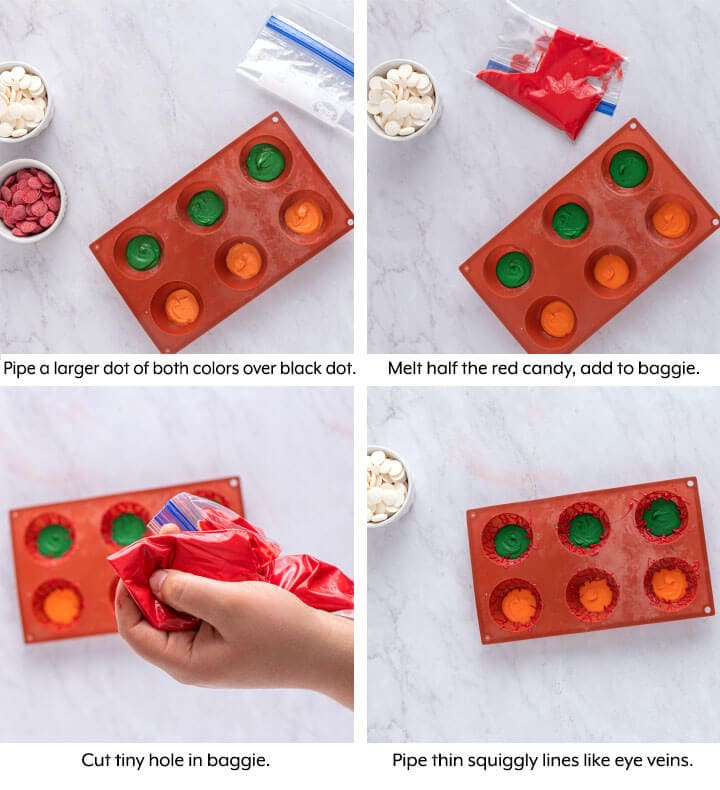
- Warm the half of the red candy melts in 30 second intervals, stirring each time. This will take 30-60 seconds. Once melted, spoon into a baggie. Snip a very small hole in one corner. Pipe a bunch of squiggly lines going up the sides of each half sphere mold to create a bloodshot look. The more you pipe, the more bloodshot it will look, however, piping too much will cause it to look excessively done. Place into the freezer to quickset for 5 minutes.
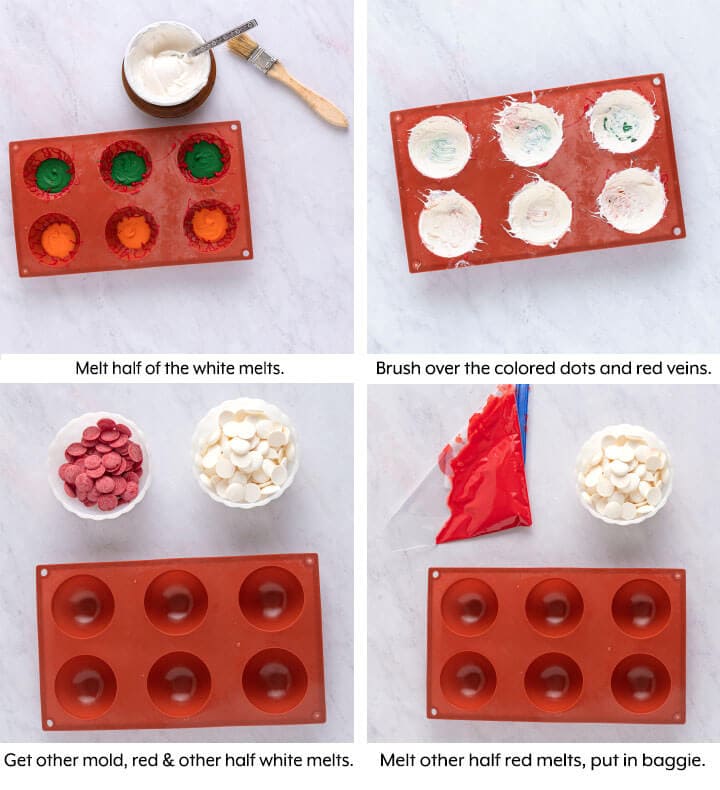
- Warm half of the white candy melts in the microwave in 30 second intervals, stirring each time. This should take 60-90 seconds to completely melt. Using a pastry brush, brush a thick layer of white candy melt over the entire surface of each mold. Be gentle and quick when brushing over the red lines as the warm candy will cause the thin red lines to melt. Be sure to coat the molds well at the top edges as these will be delicate. Place into the freezer to quickset for 5 minutes. Once set, gently remove from the silicone molds and set aside.
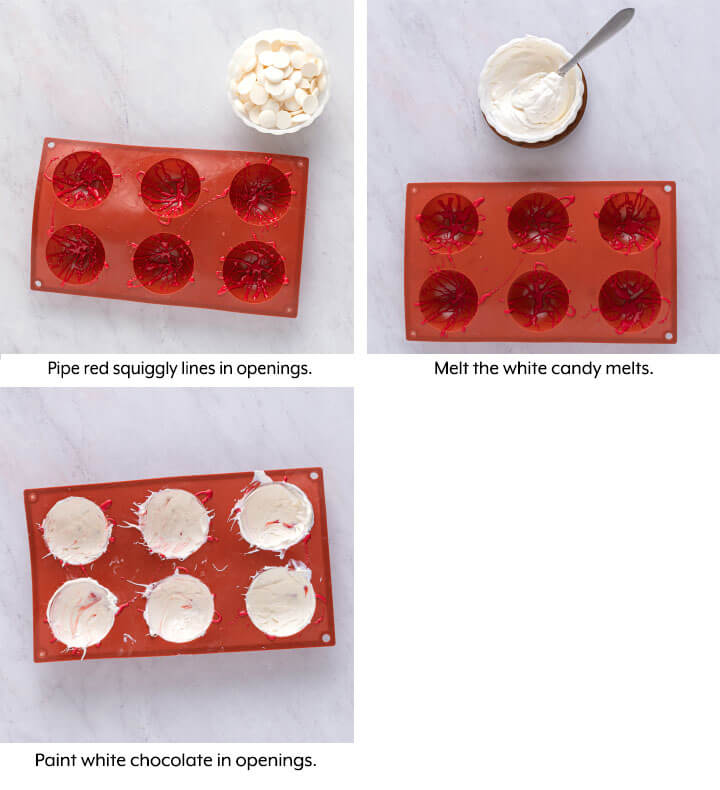
- To make the bottom halves, melt the remaining red candy melts. Repeat the previous steps to make the squiggly bloodshot look. Place into the freezer to quickset for 5 minutes. Melt the remaining white candy melts. Use a pastry brush to completely coat the entire half sphere mold. Place into the freezer to quickset for 5 minutes. Once set, gently remove the half spheres from the silicone mold.
- Fill each of the bottom half spheres with 1 Tbs of cocoa mix. Top with a few mini marshmallows. Warm a small plate for 45 seconds to a minute in the microwave. Place the top half sphere onto the warm plate for a few seconds so that the edges melt to create a glue. Place the top half sphere onto the filled bottom half. Run a clean finger around the edges to smooth out. Repeat with the remaining spheres.
- To make the hot cocoa, place a cocoa bomb into the bottom of a mug. Top with warm milk. Let the shell melt for several seconds before stirring to emulsify.
Notes
-
- When warming up the candy melts, the white ones will occasionally burn on the bottom. Be sure that you do not warm them for more than 30 seconds at a time to avoid burning them. Make sure you mix well each time. If the candy melts do burn, discard them and start over. Be sure to wash and dry the bowl well before starting over so as to avoid any previously burnt flavor. If you warm them for 30 seconds and find they are still burning, reduce the time to 15 seconds and stir after each interval.
- Don’t add more than the recommended amount of candy melt to each mold as it will create too thick of a bomb shell and you will not be able to fill it with many fillings.
- If you are unable to “glue” both halves together, you may have too many marshmallows in the middle. Simply remove a couple marshmallows and try again.
Nutrition
Nutrition information is automatically calculated, so should only be used as an approximation.


what kind of mold do i need?
You will want a BPA free silicone mold. I have linked to one in the post.
We could not find red melts (I am sure if I had more time I could have ordered or found them but we ran out of time). But the girls got creative, and made some Jack Skelington bombs and had so much fun!
Thanks for sharing!