Instant Pot Chocolate Cheesecake
Instant Pot Chocolate Cheesecake is so easy to make. It is chocolatey, rich, and creamy. Chocolate cheesecake made in your pressure cooker! How cool is that?!
Ingredients
Chocolate Crust
- 20 Chocolate Sandwich Cookies (scrape filling out so you have a total of 40 discs)
- 1 Tbsp Sugar
- 3 Tbsp Butter, melted
Cheesecake Filling
- 2 8oz Pkgs of Cream Cheese, room temperature
- ½ cup Sugar
- 1 tsp Vanilla
- 1 cup Chocolate Chips, semi sweet (or mix semi sweet and dark chocolate)
- ½ cup Heavy Cream, room temperature
- ½ tsp Instant Espresso Powder (you can do without, but it enhances the chocolate flavor!)
- 1 Tbsp Unsweetened Cocoa Powder
- 2 Eggs, room temperature
Instructions
Prepare the Pan
-
Use a 7 or 8 inch cheesecake pan (I use a 7” push pan, but you can use a springform pan as well. Whatever will fit comfortably in your pressure cooker and hold all of the filling).
-
Spray the pan with baking spray. If you have parchment paper, cut a piece to fit the bottom of your pan and spray that too.
Prepare the Pressure Cooker
-
Put 1 ½ cups of water in the inner liner of the pressure cooker.
-
Put the trivet/rack in the pot as well.
Prepare a Sling
-
Usually made with aluminum foil, used to get the cheesecake in and out of the pot easily.
-
Fold a 28” length of foil along the long end 3 times. You will end up with a sling that is 28” x 3”
Prepare the Crust
-
Scrape the filling out of the cookies and place them in a food processor. Discard the filling.
-
Add 1 Tbsp sugar.
-
Pulse several times until the cookies turn into fine crumbs.
-
Add the melted butter and pulse several times to combine and soften the crumbs. You may need to scrape the bowl of the food processor and pulse a few more times.
-
Pour crust mixture into your prepared pan and use your fingers or the bottom of a small glass to press the mixture into place. Cover the entire bottom of the pan and come up the sides a little. You do not have to come all the way up the sides. You want the crust to be about ¼” thick or so.
-
Put the pan in the freezer to chill and firm up while you prepare the cheesecake filling.
Prepare the Cheesecake Filling
-
Clean the crust residue out of the food processor.
-
Add the cream cheese, sugar, and vanilla and pulse a several times until well combined. Then process until it's smooth and creamy.
-
In a microwave safe bowl, add the chocolate chips and heavy cream. Heat for 25 seconds in microwave. Stir well and put back in for another 25 seconds. Stir very well again. It may take a couple minutes of stirring to become creamy, which is what you want.
Let it cool to luke-warm, then stir in the espresso powder and add it to the cream cheese mixture.
-
Add the cocoa powder to the cream cheese mixture and pulse a few times to combine. Then process until smooth and creamy.
-
Add the eggs last. Pulse just until combined. If you whip the eggs too much the cheesecake will puff up and won’t have the right consistency.
-
Take the crust from the freezer and pour the filling into the pan.
-
Cover the pan with a paper towel, then with a piece of foil. Crimp the edges around the pan so it stays taut and secure.
-
Lay the sling out and set the pan on it, centered. Gather up the two ends and very carefully lift the pan and set it in the pressure cooker, leaving the sling with it. Just fold over the two ends of the sling on top of the pan.
Cook the Cheesecake
-
Close the lid of the pressure cooker and set the steam vent to the Sealing position.
-
Press the Manual (or Pressure Cook) button and then the + or - button to choose 40 minutes. High pressure.
-
When cook cycle ends, let the cooker naturally release pressure for 20 minutes. Then manually release the remaining pressure.
-
When the pin drops and it is safe to open the lid, do so carefully, facing away from you.
-
Gather up the two ends of the sling and VERY carefully lift the cheesecake pan out of the cooker and onto a cooling rack.
-
Leave covered for a few minutes, then carefully peel off the foil/paper towel.
-
Let cool for an hour, then put the pan in the fridge to chill for at least 4 hours before serving. I prefer to make my cheesecake in the evening and let it cool overnight.
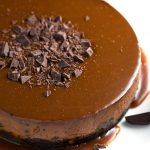
Topping - Optional
-
Top with extra chocolate, caramel sauce, whipped cream, strawberries or other fruit, or a sweet sour cream topping (Cheesecake in photos has my Caramel Sauce poured over it. Very good!).
Recipe Notes
This is a very creamy cheesecake. I think it tastes best after it has warmed up a bit. Almost to room temp. The texture is more creamy than cake like.